
How To Fix Dictation Not Working on iPhone, iPad, Apple Watch, And Mac

Dictation permits you to enter textual content utilizing your voice as a substitute for typing on the keyboard. It’s additionally identified by different names like speak to textual content, voice to textual content, or speech to textual content. Nevertheless, typically the dictation microphone icon could also be lacking on the keyboard or it could not convert what you converse into textual content.
If dictation isn’t working in your iPhone, iPad, Apple Watch, or Mac, listed below are some dependable options to repair the issue.
Hook up with Wi-Fi or Mobile
You need to use dictation offline on iPhone 6s and later. Nevertheless, not all dictation languages work without being linked to the web. So, for the finest outcomes, be certain your iPhone or iPad is linked to Wi-Fi or mobile knowledge.
Plus, when you choose a brand new dictation language (or instantly after establishing your iPhone), you'll have to connect with Wi-Fi for helpful information to obtain.
Allow and disable Airplane Mode
Go to the iPhone or iPad settings app and allow Airplane Mode. After ready for a round of 15 seconds, faucet the identical toggle to show off the Airplane Mode.
Drive stop the app in query and reopen it
If dictation isn’t working in a specific app, drive shut and reopen it. After that, faucet the microphone key on the iOS keyboard and attempt to use dictation. It ought to enter what you converse.
Restart your iPhone
When dictation shouldn't be engaged on iPhone, or it comes and disappears from the display, merely flips off your iPhone and switch it again on. It’s a necessary repair. So, ensure you don’t skip it.
Disable and re-enable dictation to refresh it
Comply with these steps to show off and activate dictation which ought to guarantee it begins working appropriately. This explicit step will enable you to confirm in the event you had enabled dictation in the first place or not!
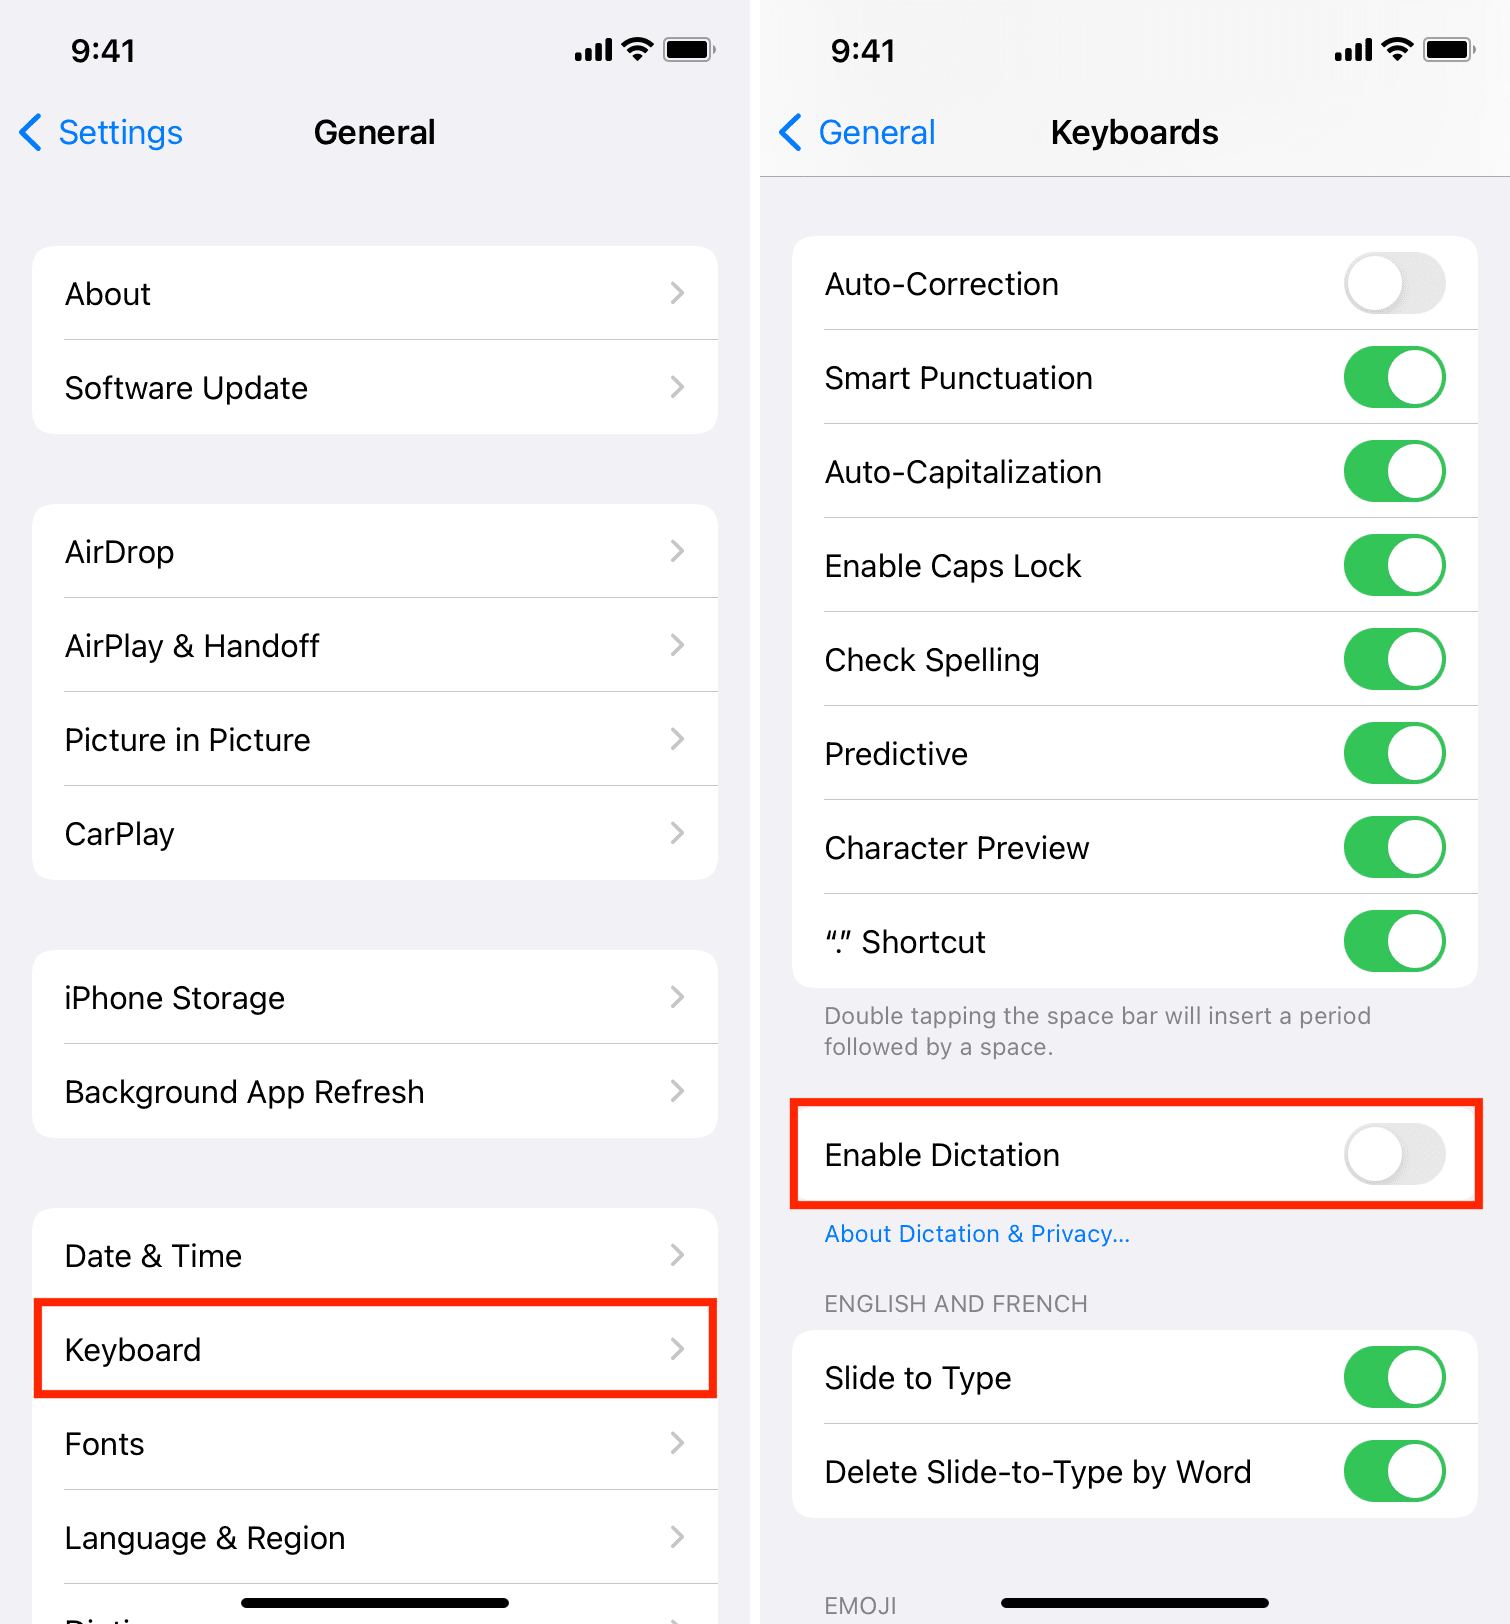
- Open iPhone, iPad, or iPod contact Settings and faucet Basic.
- Faucet Keyboard.
- Flip off Allow Dictation > Flip Off Dictation.
- Watch for just a few seconds and restart your iPhone.
- Go to Settings > Keyboard and activate the swap for Allow Dictation.
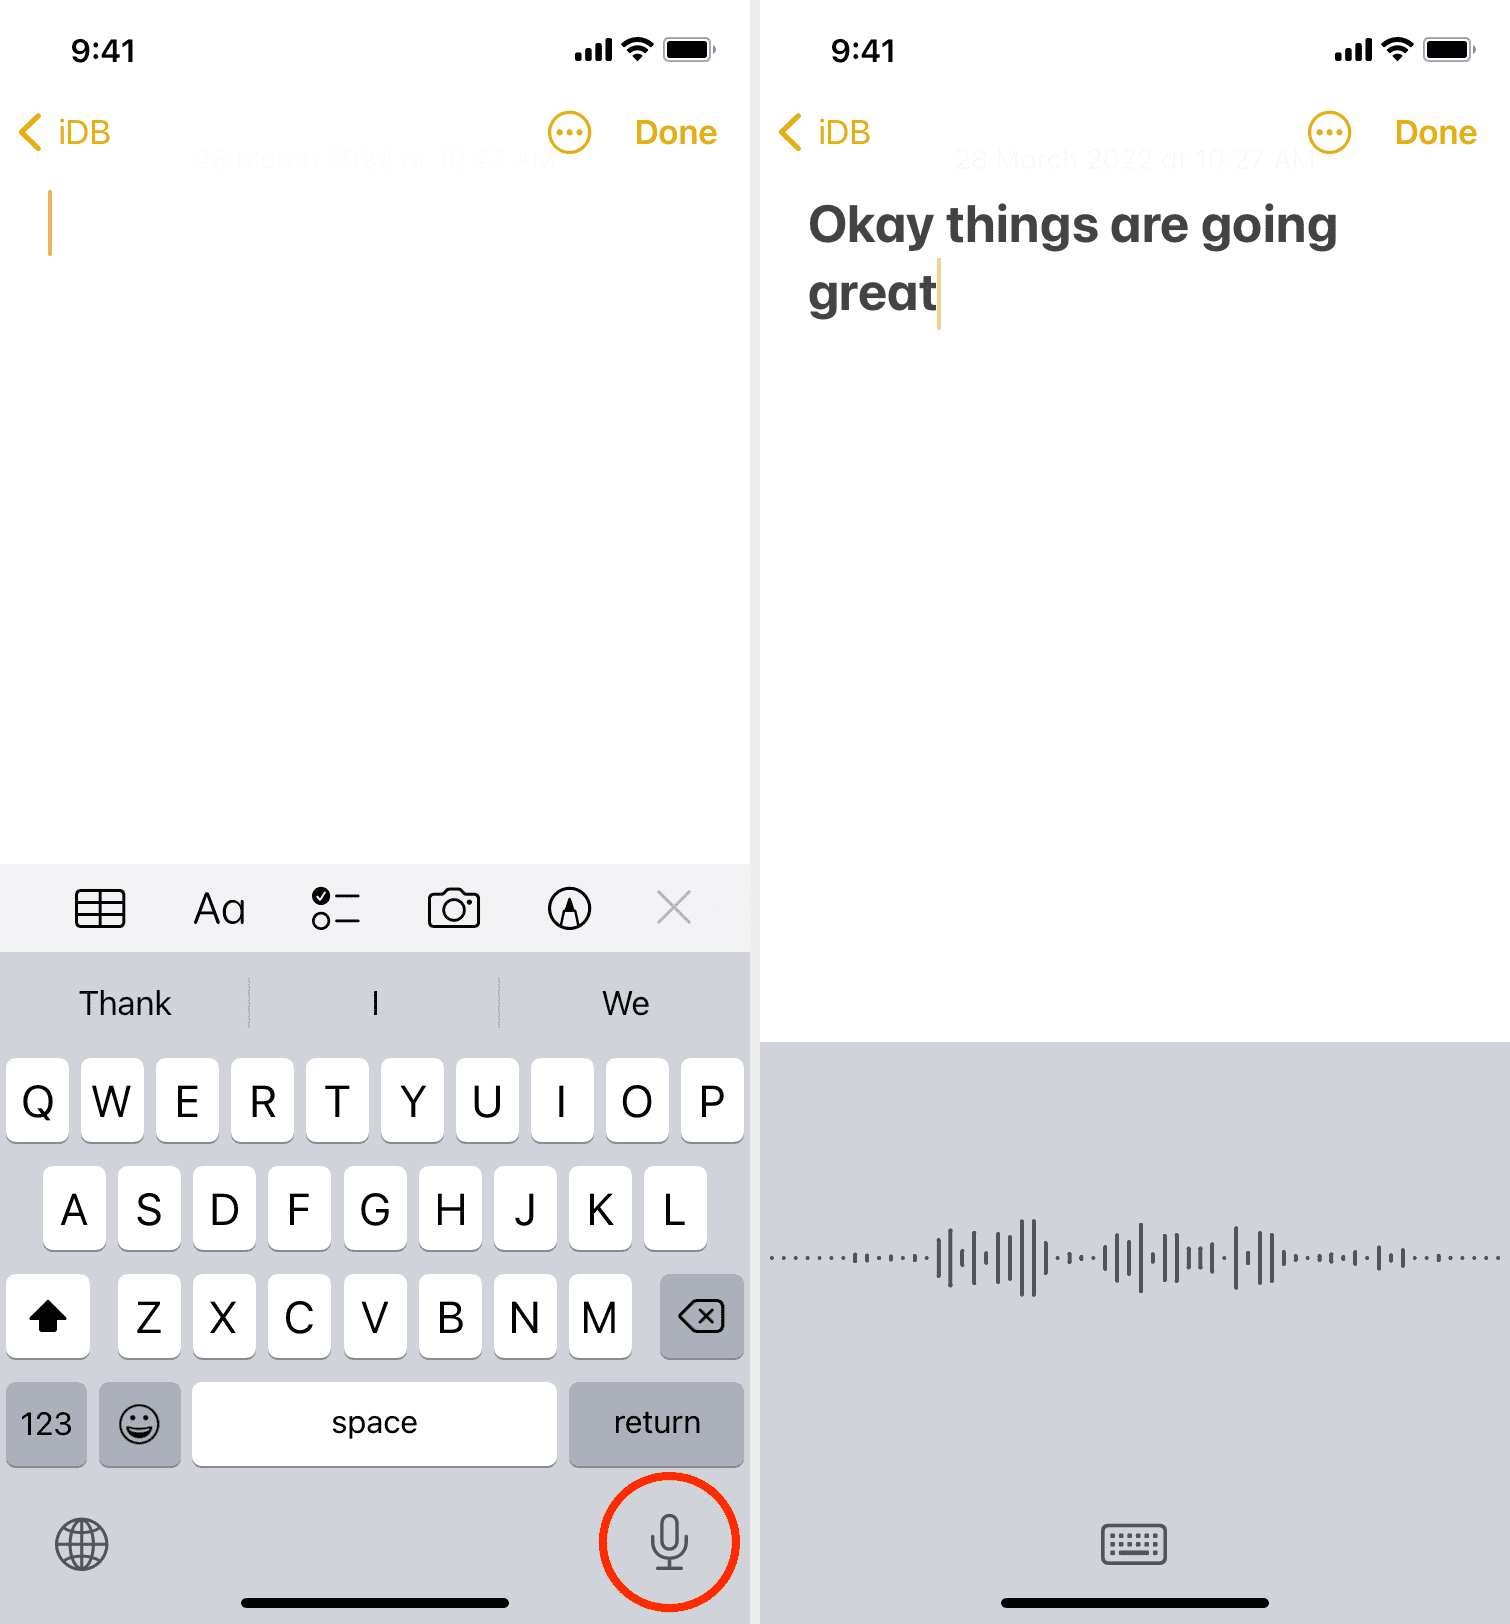
Now, open the Apple Notes app, faucet the microphone icon on your keyboard, and dictation ought to work like an allure.
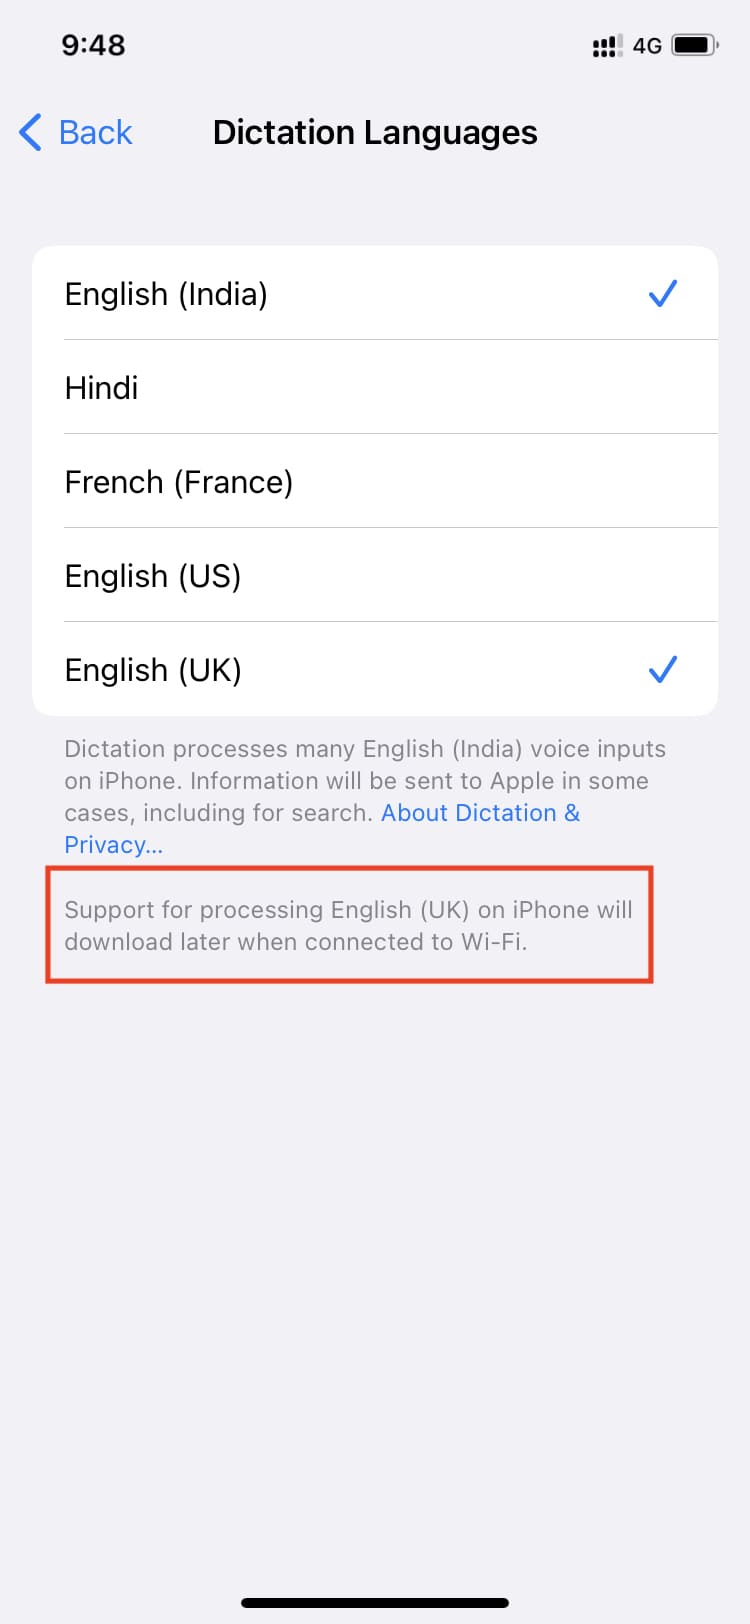
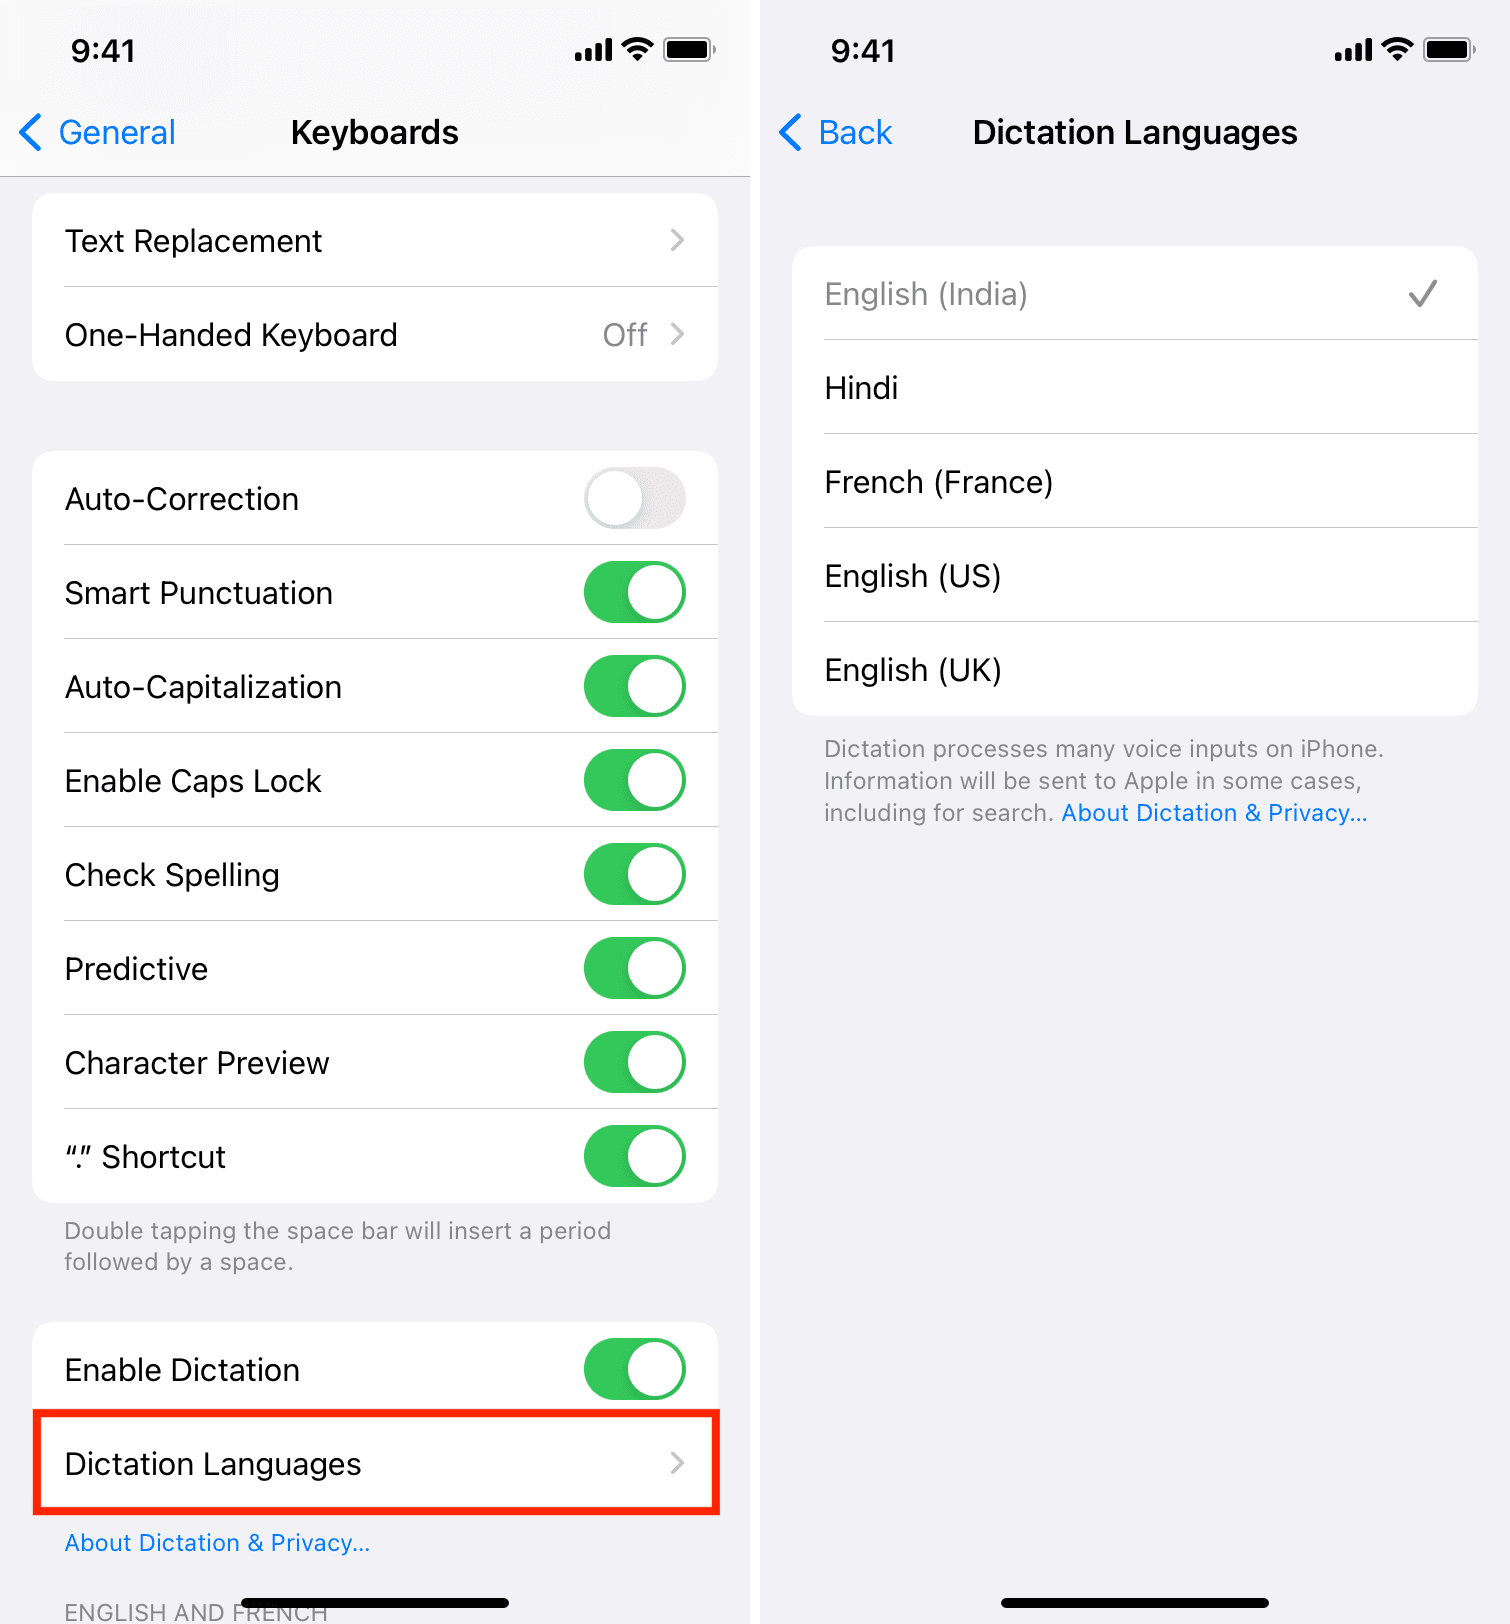
If you happen to be bilingual or multilingual, you might need added multiple keyboards to your iPhone. After that, you’ll see a Dictation Languages possibility seem under the Allow Dictation toggle. Faucet it and uncheck all of the languages besides one. Now, restart your iPhone and take a look at utilizing dictation. It ought to work as anticipated.
As soon as that’s achieved, you'll be able to test extra dictation languages if you wish to use them. In case doing so begins inflicting dictation issues once more, replace your iPhone.
Essential: Ensure you choose the correct accent for a similar language. For instance, if I’m from India, for the finest outcomes, I ought to choose English (India) as my dictation language as a substitute for English (US) or English (UK).
Is dictation possibility lacking in iPhone Settings?
If you happen to don’t see the Allow Dictation possibility within the steps above, comply with these two fixes:
Add iOS keyboard
You'll lose Apple’s dictation function in the event you add only a third-party keyboard (like SwiftKey) and take away the built-in Apple keyboard. To see the Allow Dictation possibility in iPhone keyboard settings, do the next:
- Go to Settings > Basic > Keyboard > Keyboards > Add New Keyboard.
- Select a keyboard below Prompt Keyboards or Different iPhone Keyboards.
- Now return and it's best to see the Allow Dictation possibility. If not, restart your iPhone.
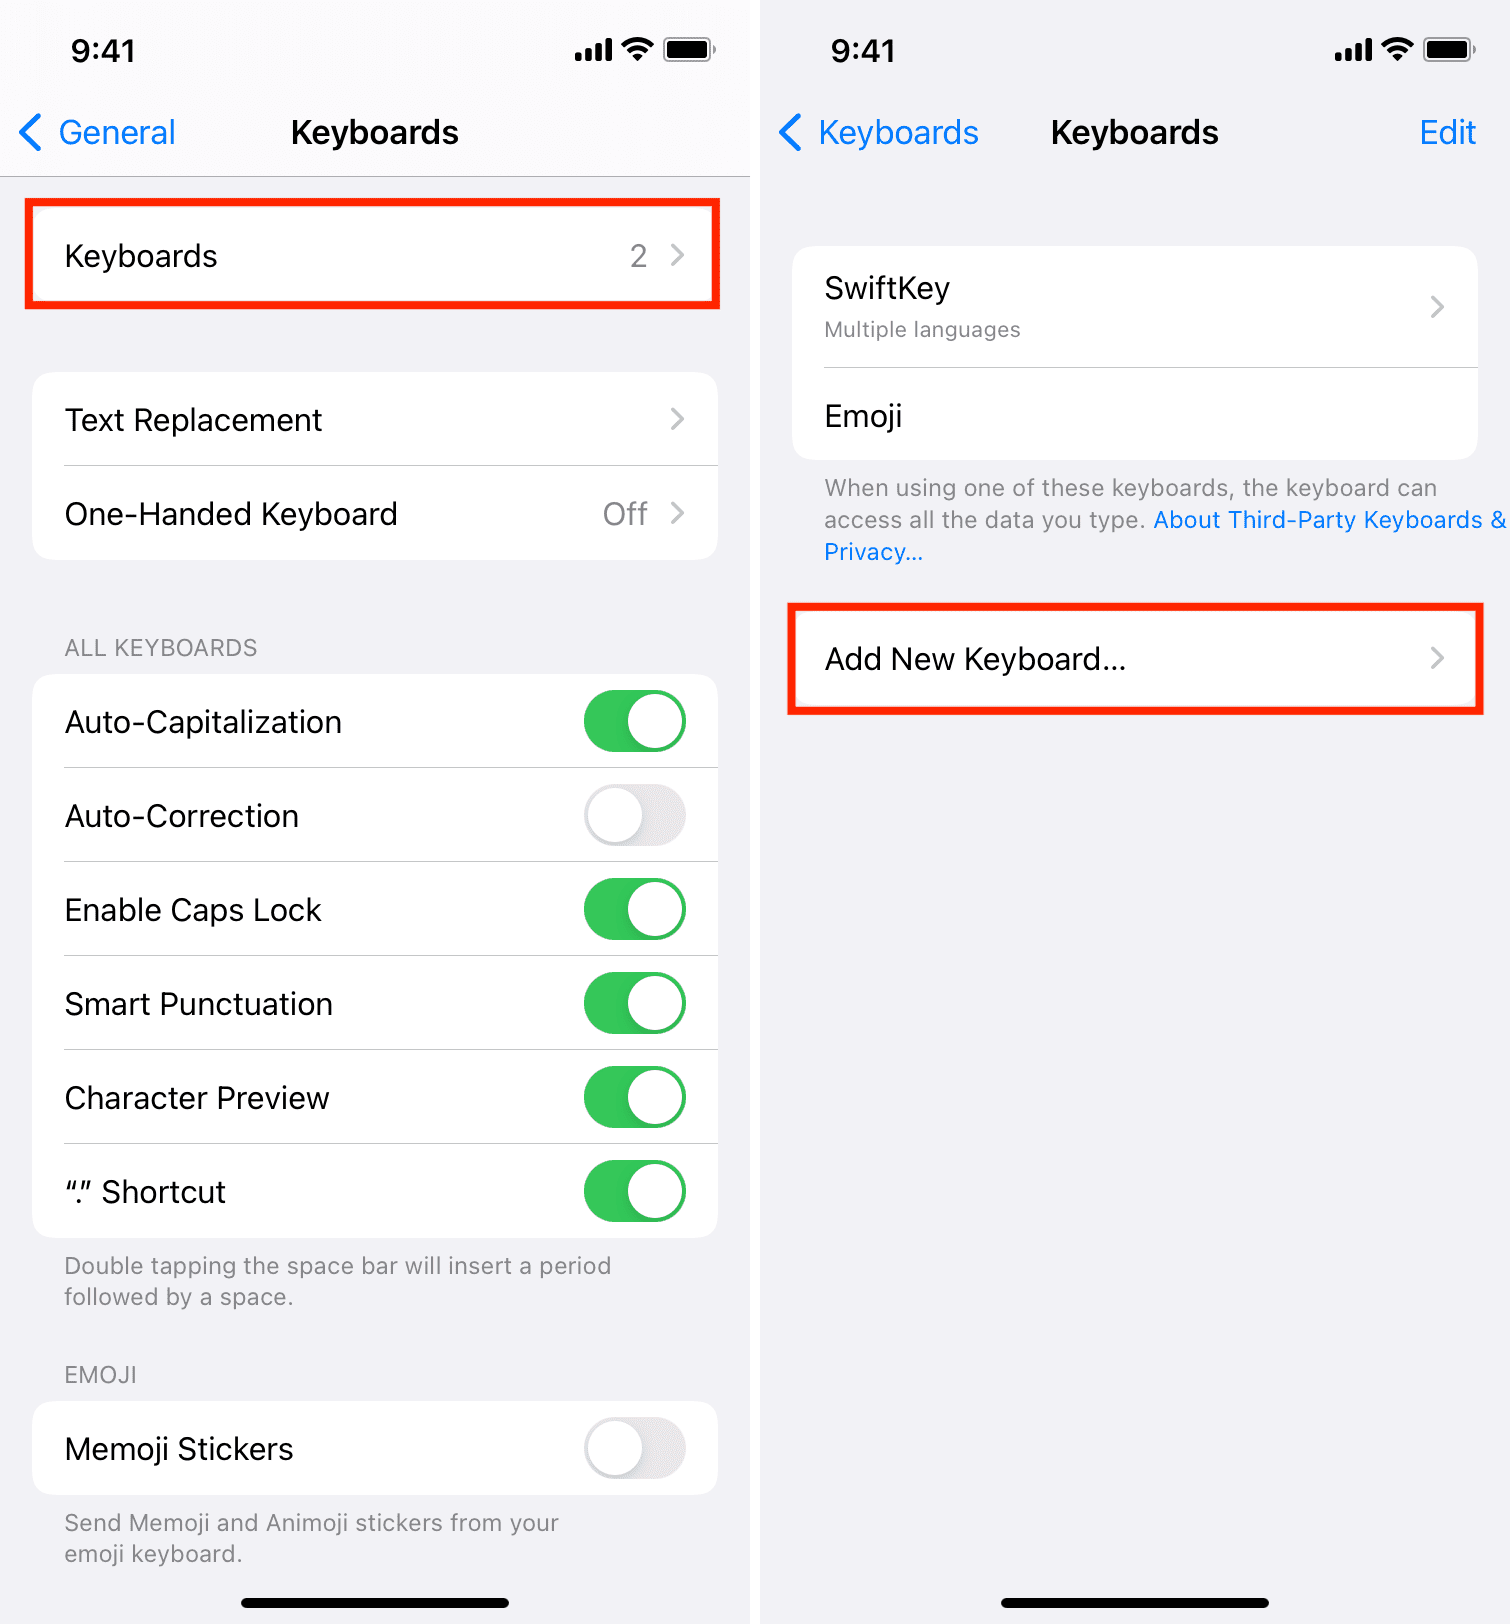
Notice: Some third-party keyboards (like SwiftKey) may supply their very own dictation function. You need to use that whereas utilizing the third-party keyboard.
Unrestrict Siri & Dictation
Comply with these steps to make sure dictation shouldn't be restricted:
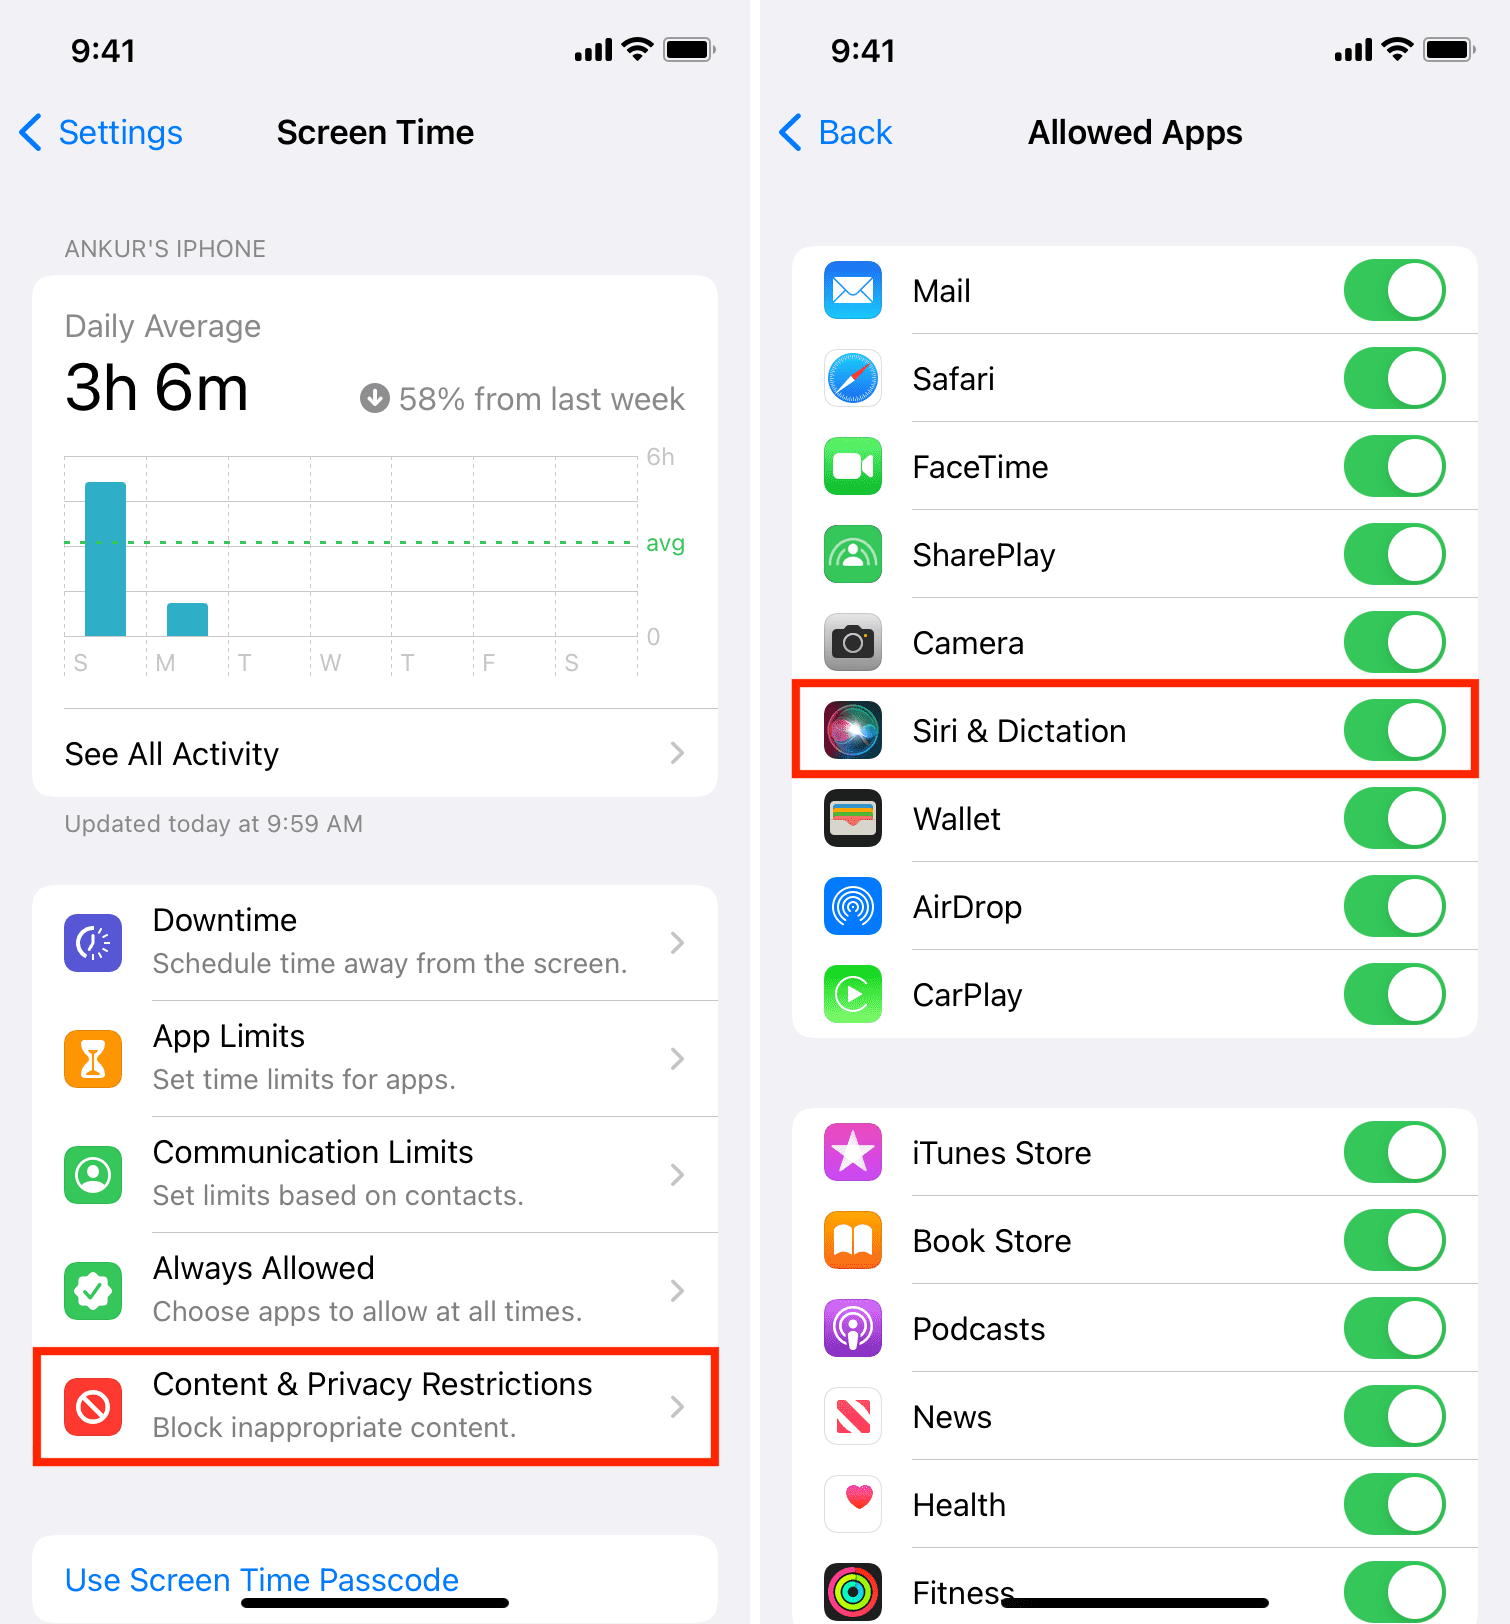
- Open iPhone or iPad Settings and faucet Display Time.
- If it says, Flip On Display Time, you'll be able to skip all of the steps under. Else, faucet Content material & Privateness Restrictions.
- If Content material & Privateness Restrictions are disabled, you'll be able to skip the steps under. If it’s enabled, faucet Allowed Apps.
- Beneath Allowed Apps, be certain Siri & Dictation is enabled.
It's best to see the Allow Dictation possibility after including the iOS keyboard and guaranteeing dictation isn’t restricted.
Strive to utilize dictation without AirPods or earphones
On occasions, you might not have the ability to use dictation in any respect, or it could perform poorly with wired or wi-fi earphones. If it isn’t working in any respect, be certain your iPhone isn’t caught in headphone mode.
Take away the iOS keyboard and add it once more
Right here’s how one can take away the iPhone keyboard and re-add it to make sure dictation works:
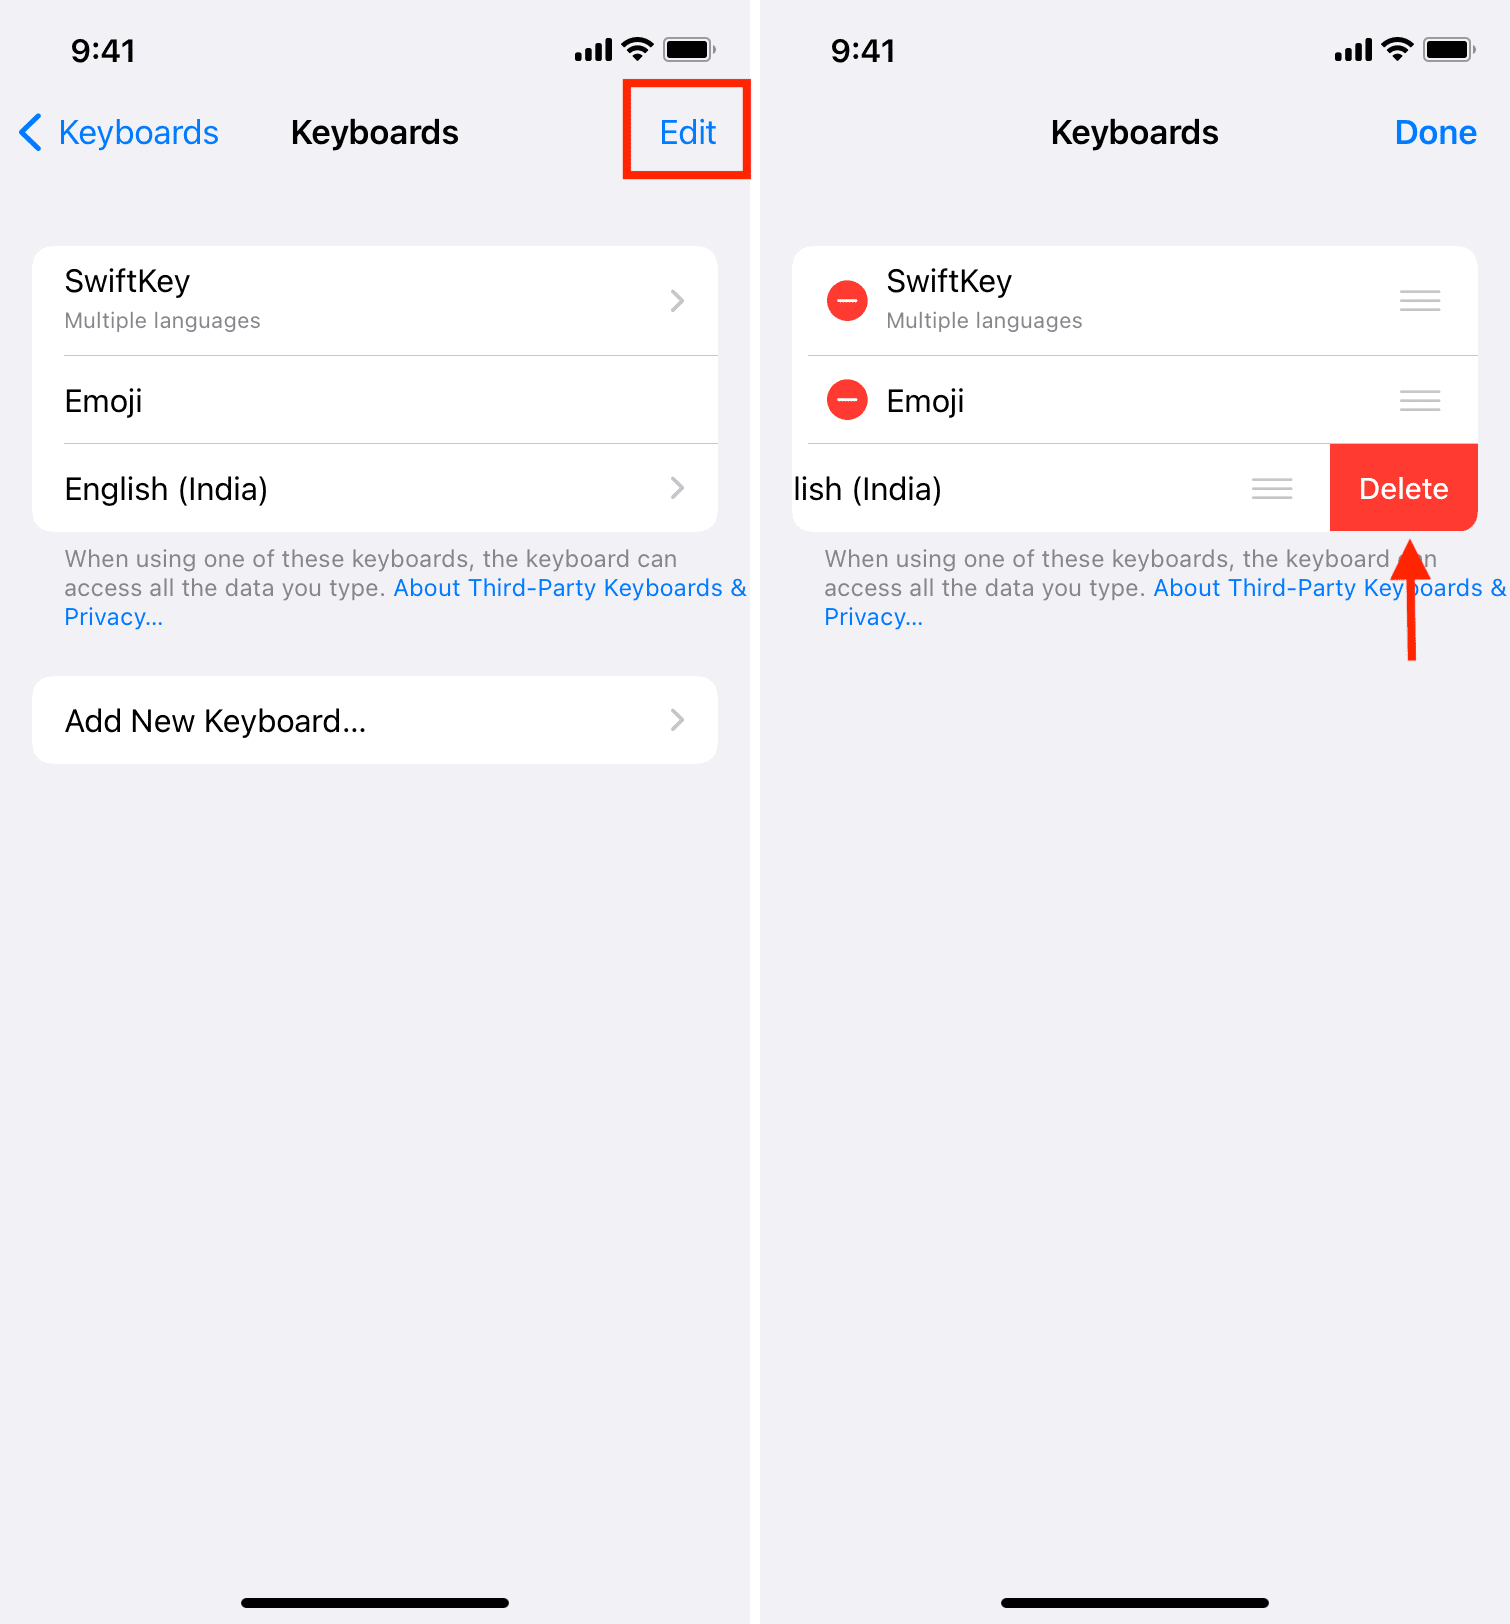
- Go to Settings > Basic > Keyboard > Keyboards.
- Faucet Edit > purple minus icon > Delete > Accomplished to take away the keyboards. You'll be able to depart the Emoji keyboard.
- Faucet Add New Keyboard and choose your required iPhone keyboard. Now, open Notes or an identical app and use dictation. It ought to work nicely.
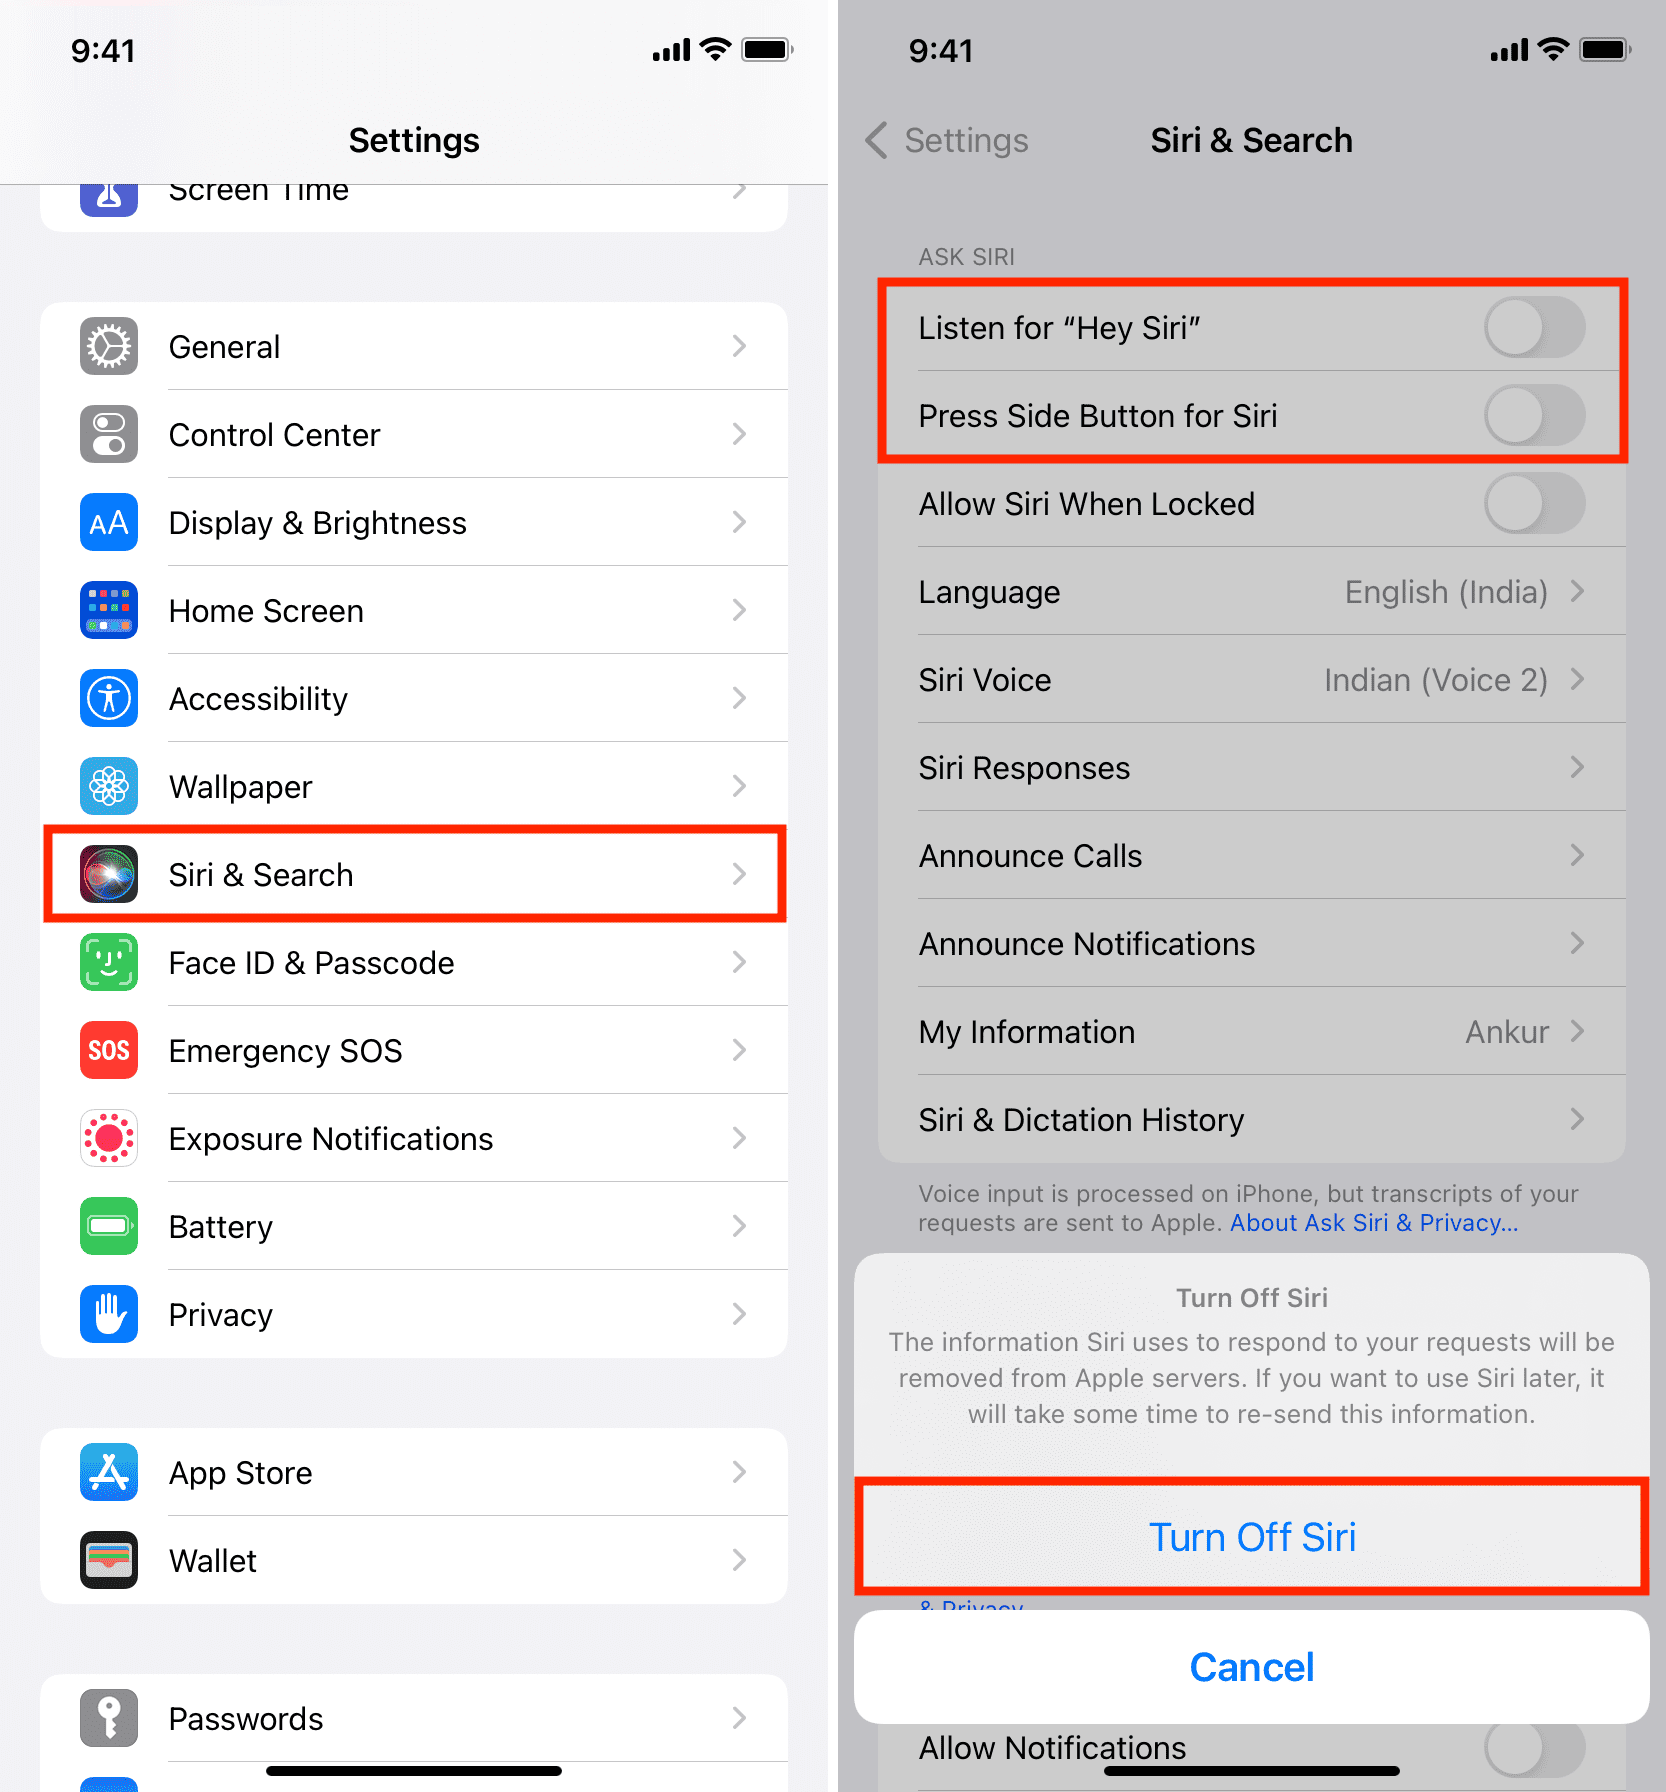
Flip off Siri and switch it again on
Siri and dictation are associated. So, if dictation isn’t working after following the above options, flip Siri on and off.
- Go to Settings and faucet Siri & Search.
- Flip off Hear for “Hey Siri” and Press Aspect (or House) Button for Siri.
- Restart your iPhone.
- Allow Siri once more by turning on the switches you turned off in step 2.
Clear iPhone’s microphone
In case your iPhone’s microphone grills are soiled, it could trigger blockage, which causes poor expertise on calls, Siri, voice recordings, dictation, and different associated issues. To repair this, ensure you take away any iPhone case and use material, dry brush, or toothpick to wash the microphone holes.
Essential: If any exterior machine (like earphones) is hooked up to your iPhone, disconnect it to make sure the on-device mic is used.
Replace your iPhone
We can rule out the potential for dictation being flaky because of software program bugs. To repair this, go to iPhone Settings > Basic > Software program Replace and get the most recent model of iOS.
Reset community settings or all settings
In case the dictation drawback continues, reset your iPhone’s community settings. This could assist, and if it doesn’t, you'll be able to reset all settings. Right here’s how you can do each.
Contact Apple Help
Lastly, if nothing helps, contact Apple Help or take your iPhone to an Apple Retailer and get it inspected. If there are points with the iPhone {hardware}, they may care for it.
Repair dictation not engaged on Apple Watch
When dictation isn’t working in your Apple Watch, comply with these fundamental fixes first:
- Restart your Apple Watch
- Be sure your watch is working with the newest model of watchOS
- Examine for Siri and Dictation restriction on iPhone (talked about above)
- Clear the Apple Look ahead to ideal microphone expertise and take away any full physique case or cowl
Moreover, the above checks, comply with these options to repair dictation not engaged on Apple Watch.
Be sure Apple Watch is linked to Wi-Fi, Mobile, or the iPhone
Your Apple Watch can connect to the web through Wi-Fi, Mobile (on mobile fashions), or use the iPhone’s web. Now we have defined extra on this attention-grabbing put up titled how you can know whether or not your Apple Watch is linked to the web or not. Dictation ought to work flawlessly as soon as Apple Watch has web connectivity.
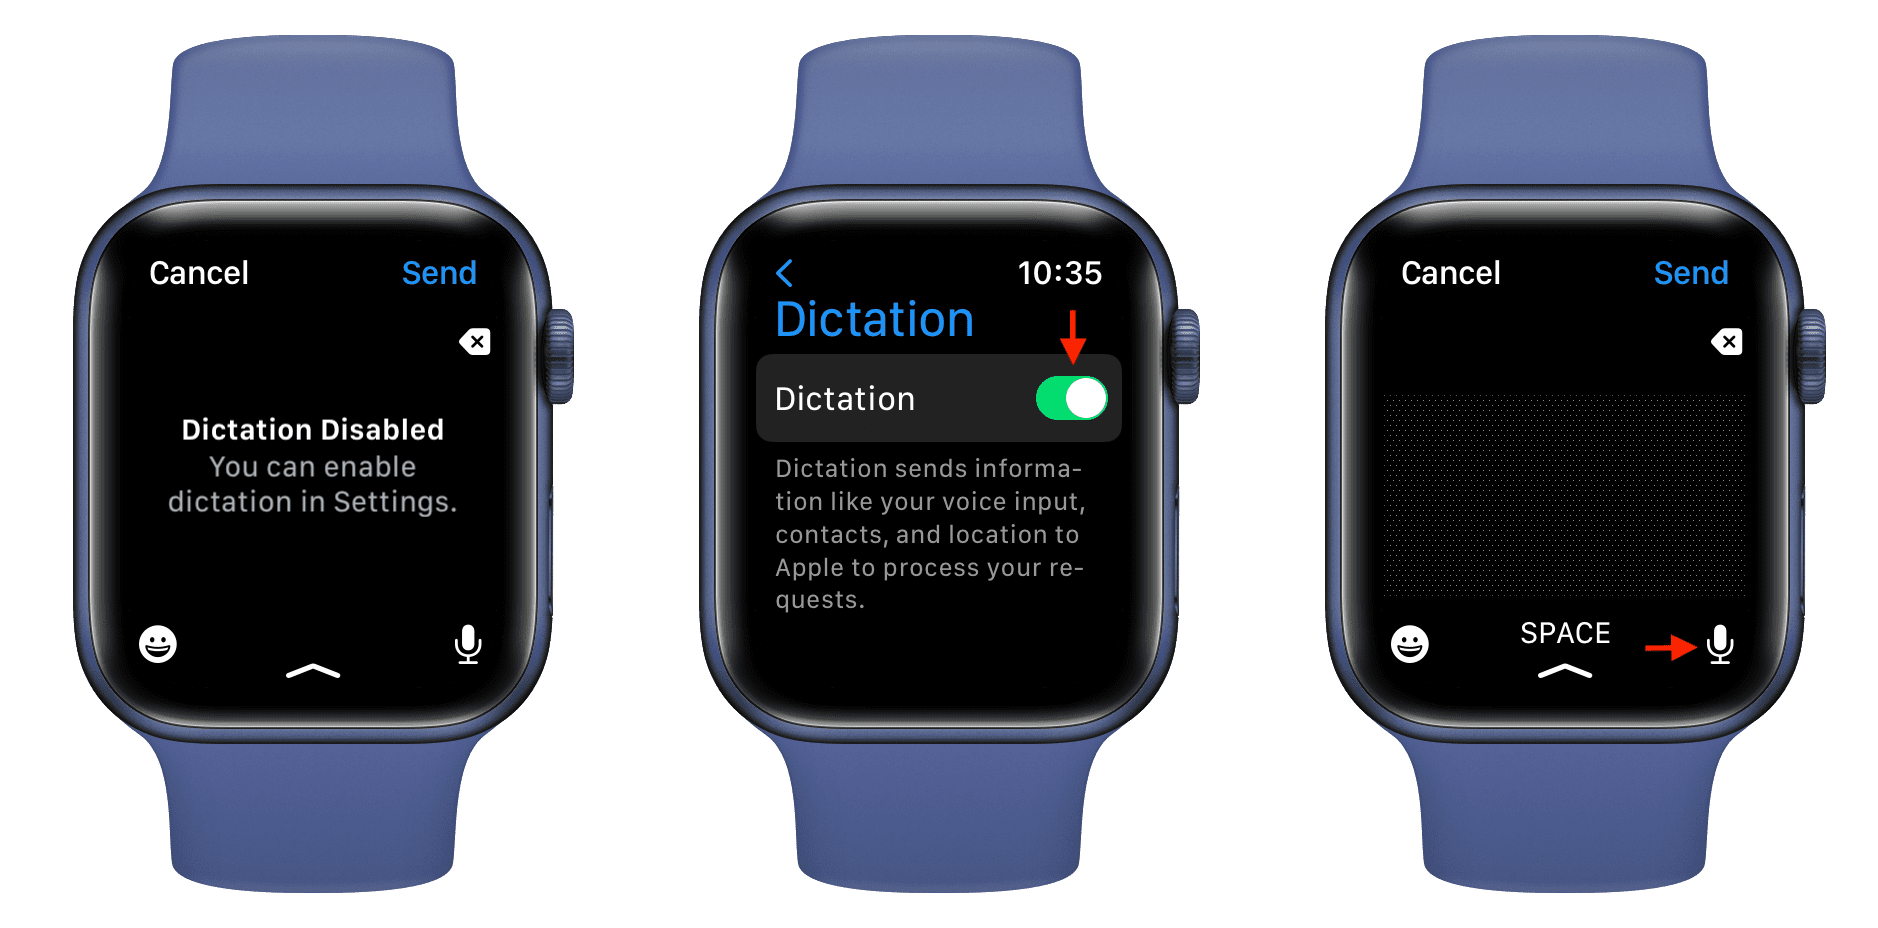
Allow dictation on Apple Watch
Do you see “Dictation Disabled. You'll be able to allow dictation in Settings” on your Apple Watch? Right here’s how you can allow (or test) dictation on Apple Watch:
- Open the Settings app on Apple Watch and faucet Basic.
- Faucet Dictation.
- Toggle on Dictation and faucet Allow Dictation to substantiate. Now return to the typing display and faucet the microphone icon to make use of dictation in your Apple Watch.
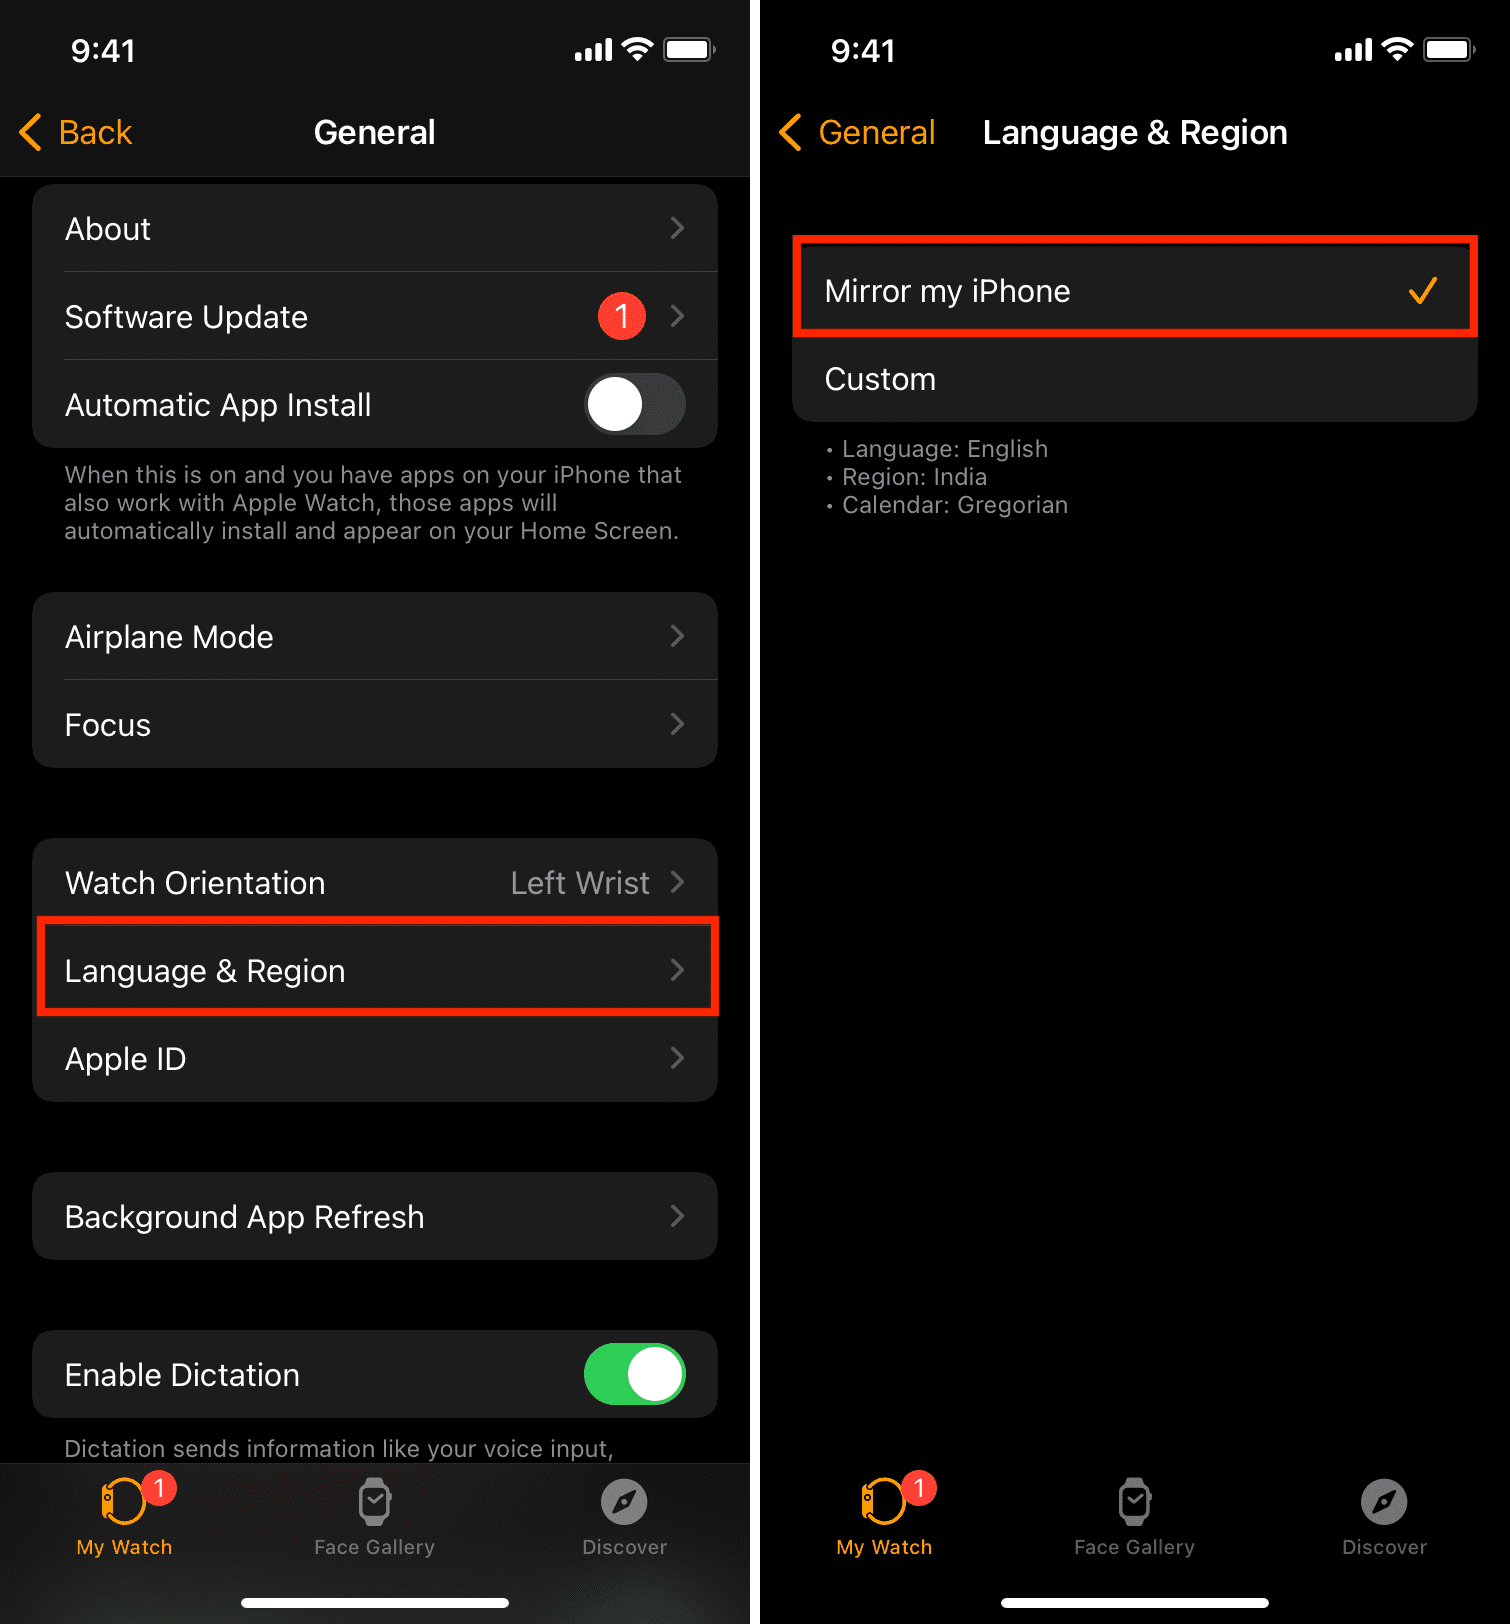
Be sure Apple Watch and iPhone language are the identical
You'll be able to merely mirror your iPhone language to your Apple Watch or use totally different settings on your wrist. However, selecting the latter could trigger dictation issues on the Apple Watch. To repair this, comply with these steps:
- Open the Watch app in your paired iPhone and faucet Basic.
- Faucet Language & Area.
- Faucet Mirror my iPhone.
- After a minute, restart your iPhone and Apple Watch. Now, dictation ought to work flawlessly in your Apple Watch and allow you to sort it together with your voice.
Unpair and restore your Apple Watch
Lastly, in the event, you’re nonetheless unable to make use of dictation in your Apple Watch, unpair it out of your iPhone and pair it once more.
Repair dictation not engaged on Mac
Right here’s how to make sure dictation begins working in your Mac and allows you to sort without the bodily keyboard.
Flip off Voice Management
Do you see “Keyboard Dictation is disabled when Voice Management is on” within the dictation preferences display on Mac?
Comply with these steps to show off Voice Management which ought to cease the conflicting points with dictation:
- Click on and select System Preferences.
- Click on Accessibility.
- Choose Voice Management from the left.
- Uncheck Allow Voice Management.
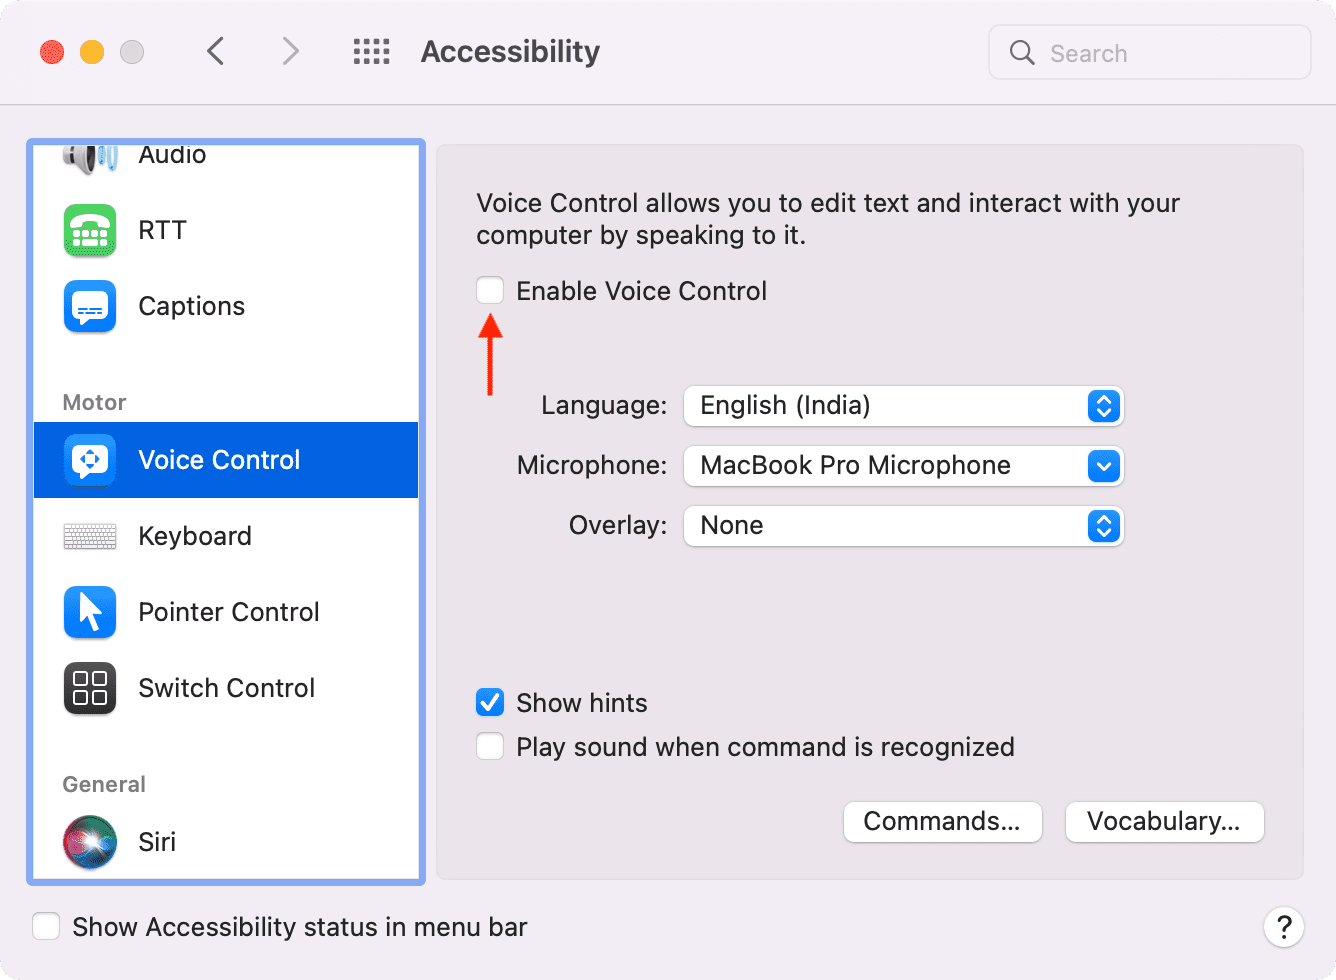
Now, you shouldn't see any error message within the dication settings on Mac.
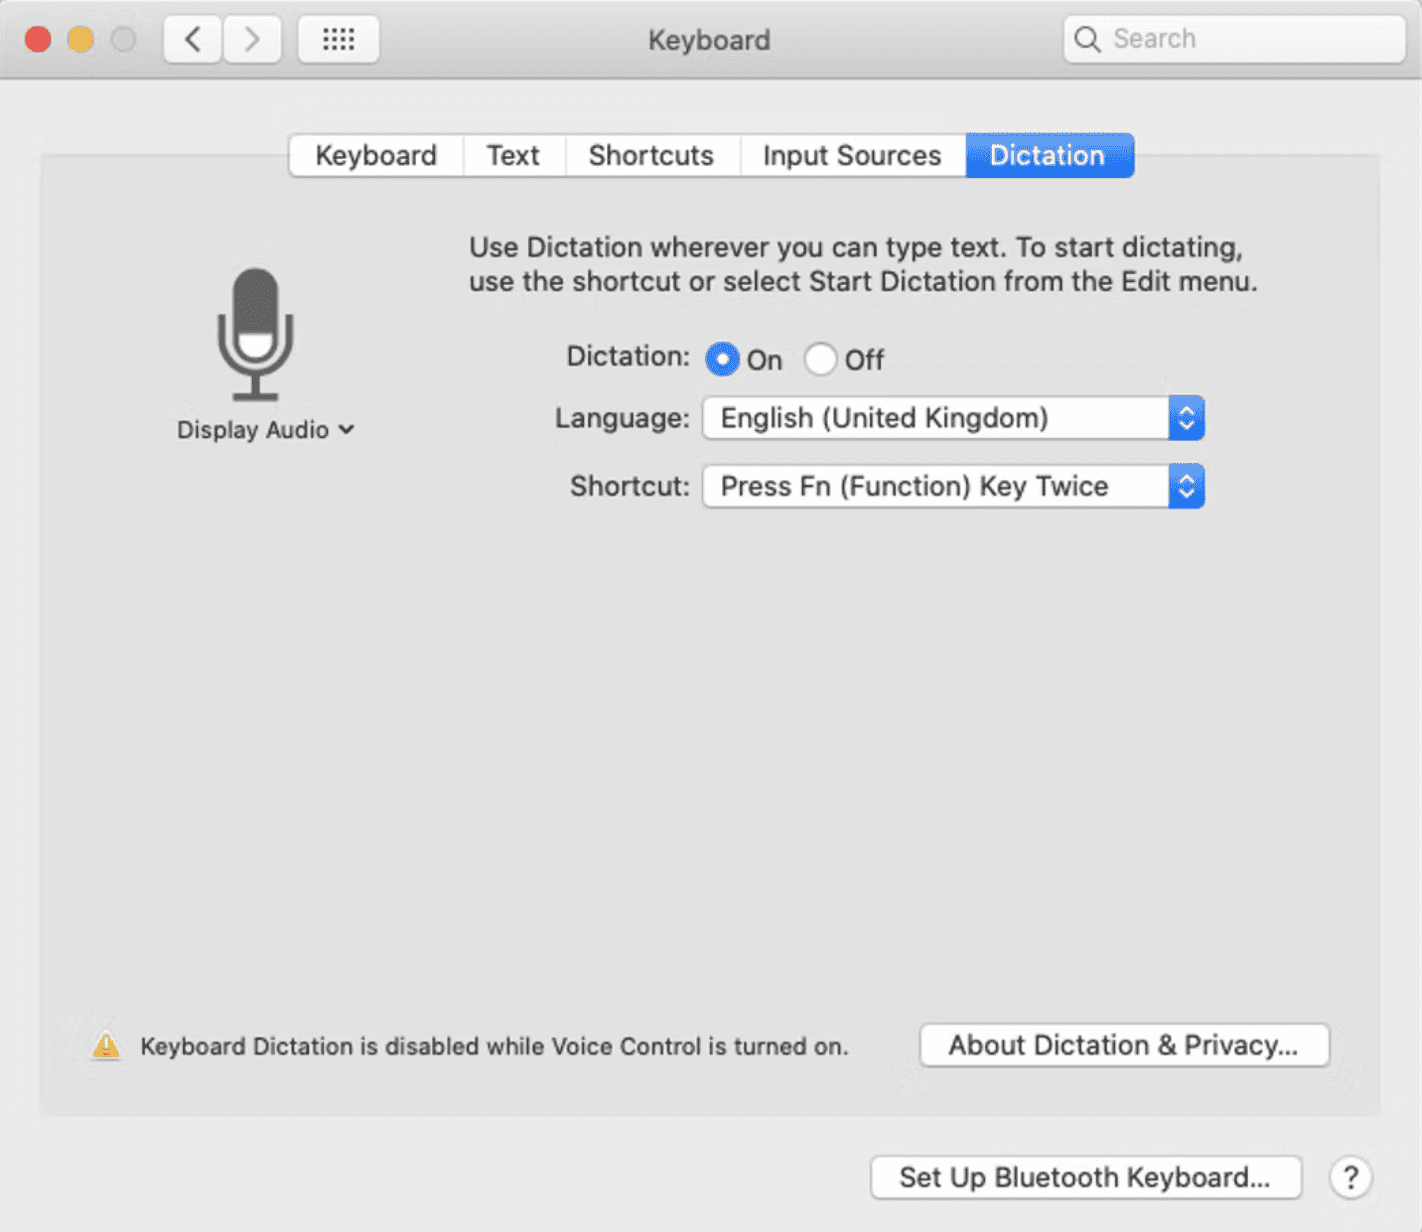
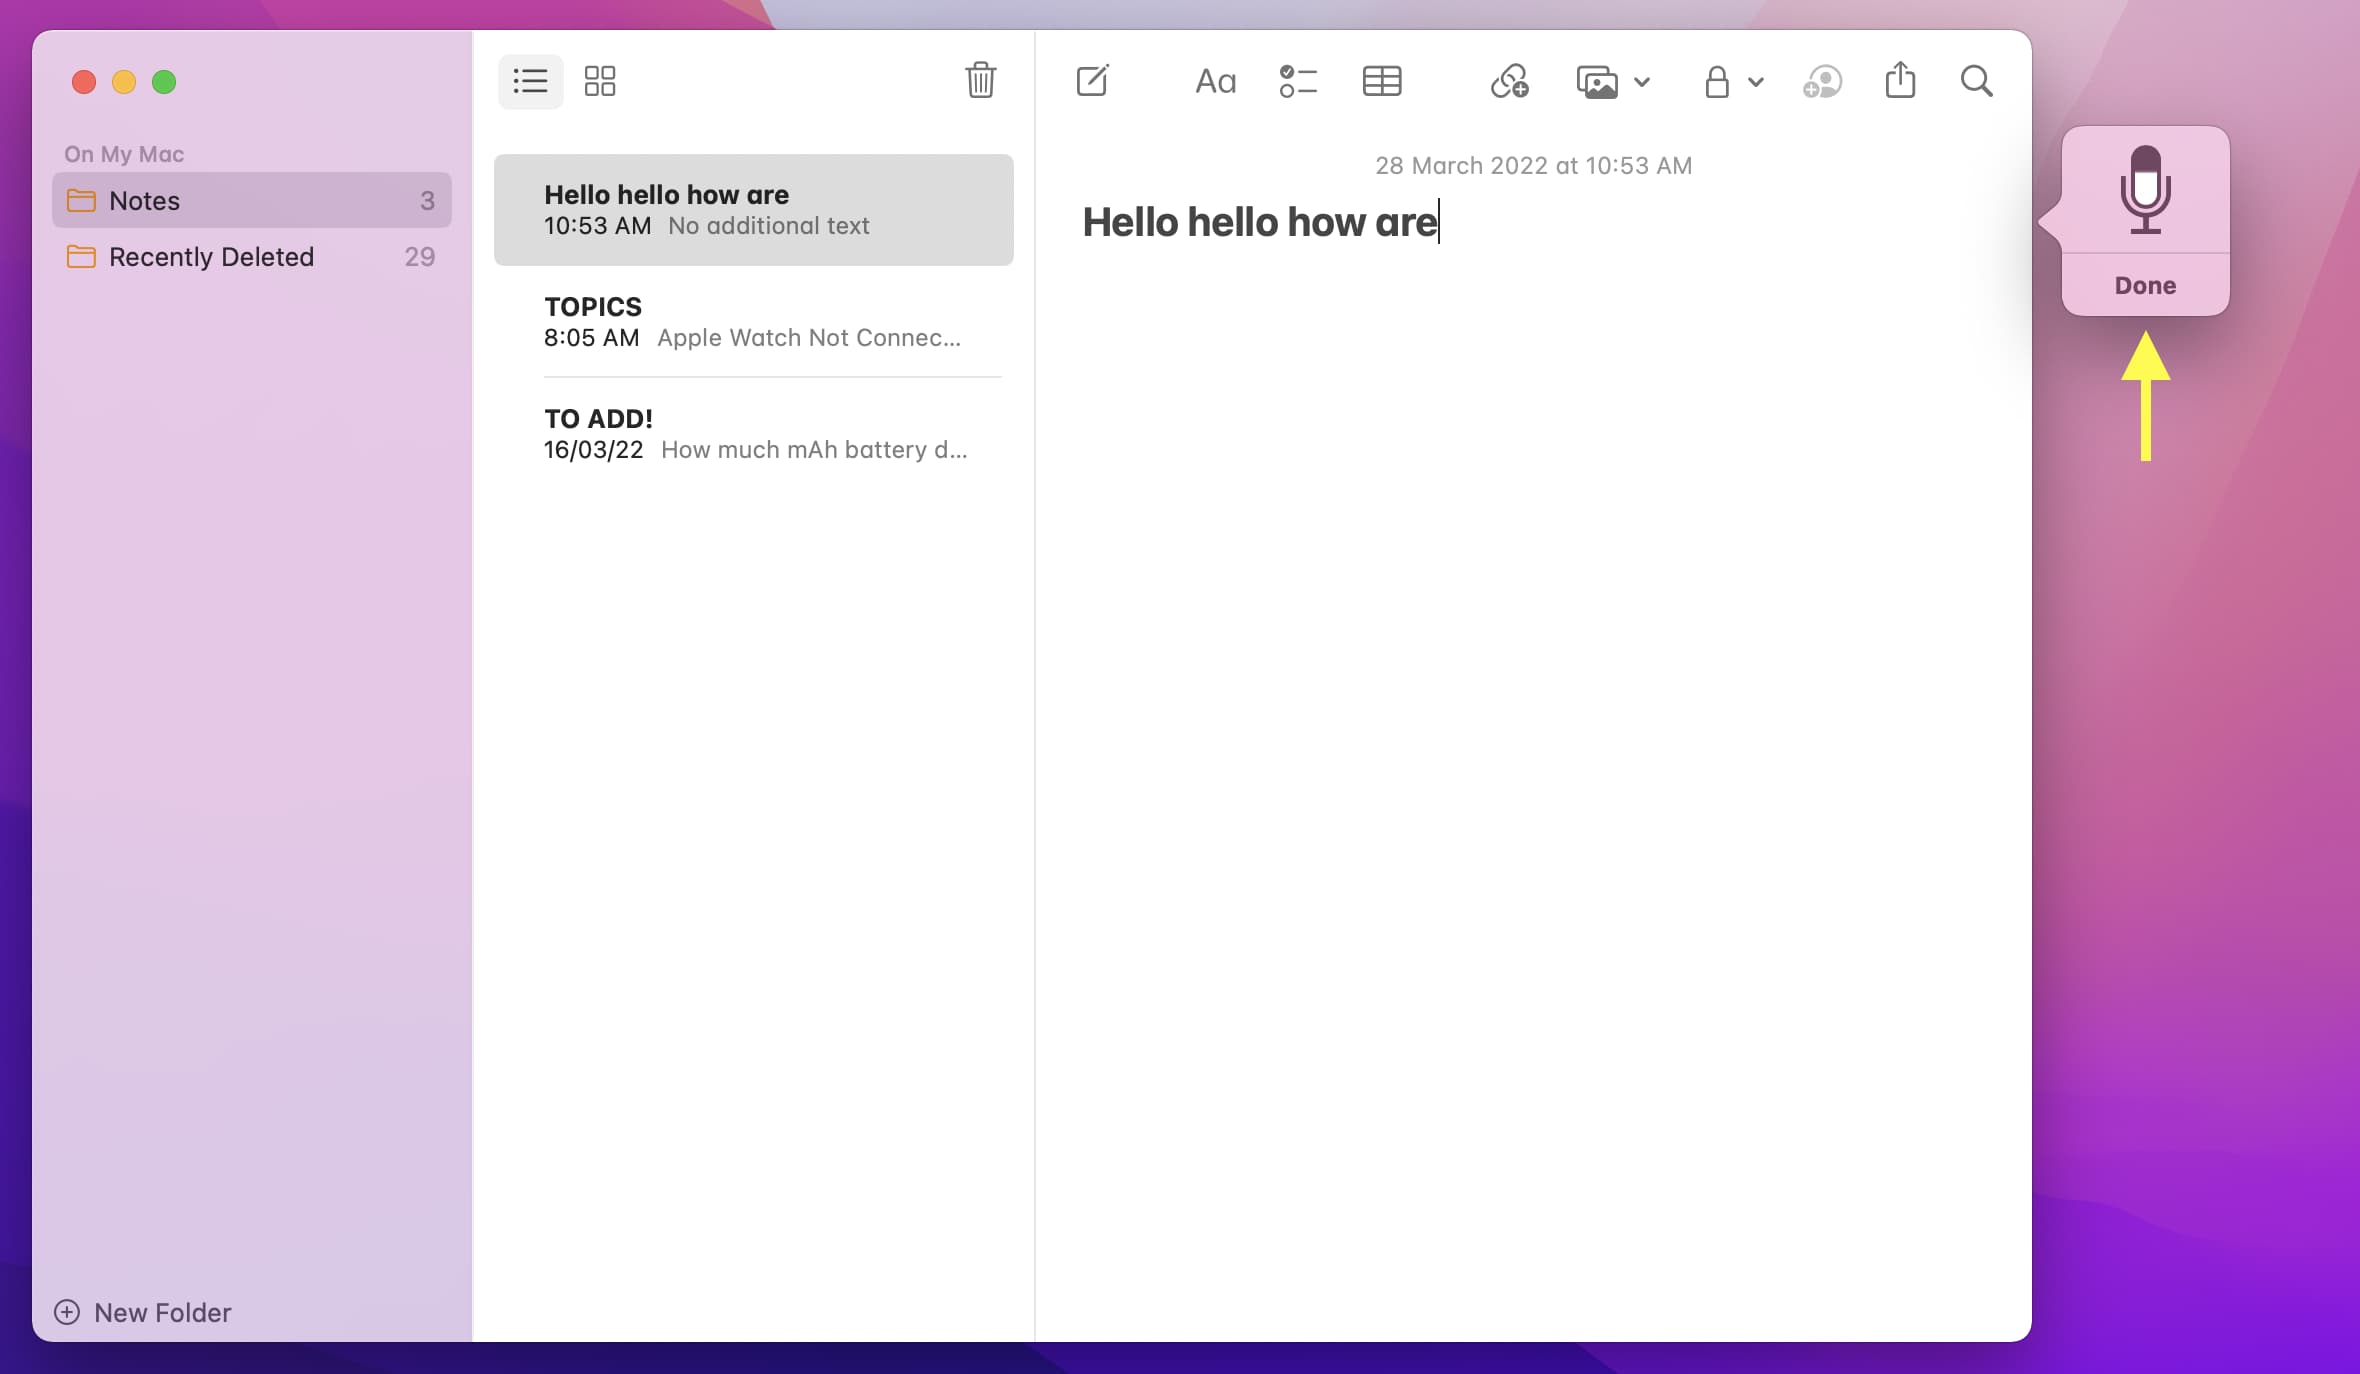
Allow dictation on Mac
To allow dictation, do any of the next:
- Press fn + D on your Mac and click on Okay > Allow Dictation.
- Whereas in a Mac app, click on Edit from the highest menu bar and select Begin Dictation.
- Go to System Preferences > Keyboard > Dictation and test the field for On.
As soon as that’s achieved, press the management key twice (or your regular dictation shortcut) to make use of dictation. You'll be able to see which keyboard shortcut is ready to start out dictation by going to System Preferences > Keyboard > Dictation.
Restart your Mac
Click on the and select Restart. As soon as that’s achieved, attempt utilizing dictation in Notes or any app the place you'll be able to sort.
Join your Mac on the web
For constant dictation expertise, be certain your Mac is linked to the web. You too can use Voice Management to dictate textual content on Mac in the event you’re offline. To make use of Voice Management, go to System Preferences > Accessibility.
Moreover, your Mac should be linked to the web to make use of dictation if:
- Offline dictation file isn’t downloaded, or
- The language you’re utilizing dictation in isn’t supported for offline dictation.
To test or refresh the offline dictation file, click on the Language dropdown menu, uncheck and re-check the specified language. Whilst you do that, be certain your Mac is linked to the web for the help file to obtain domestically.
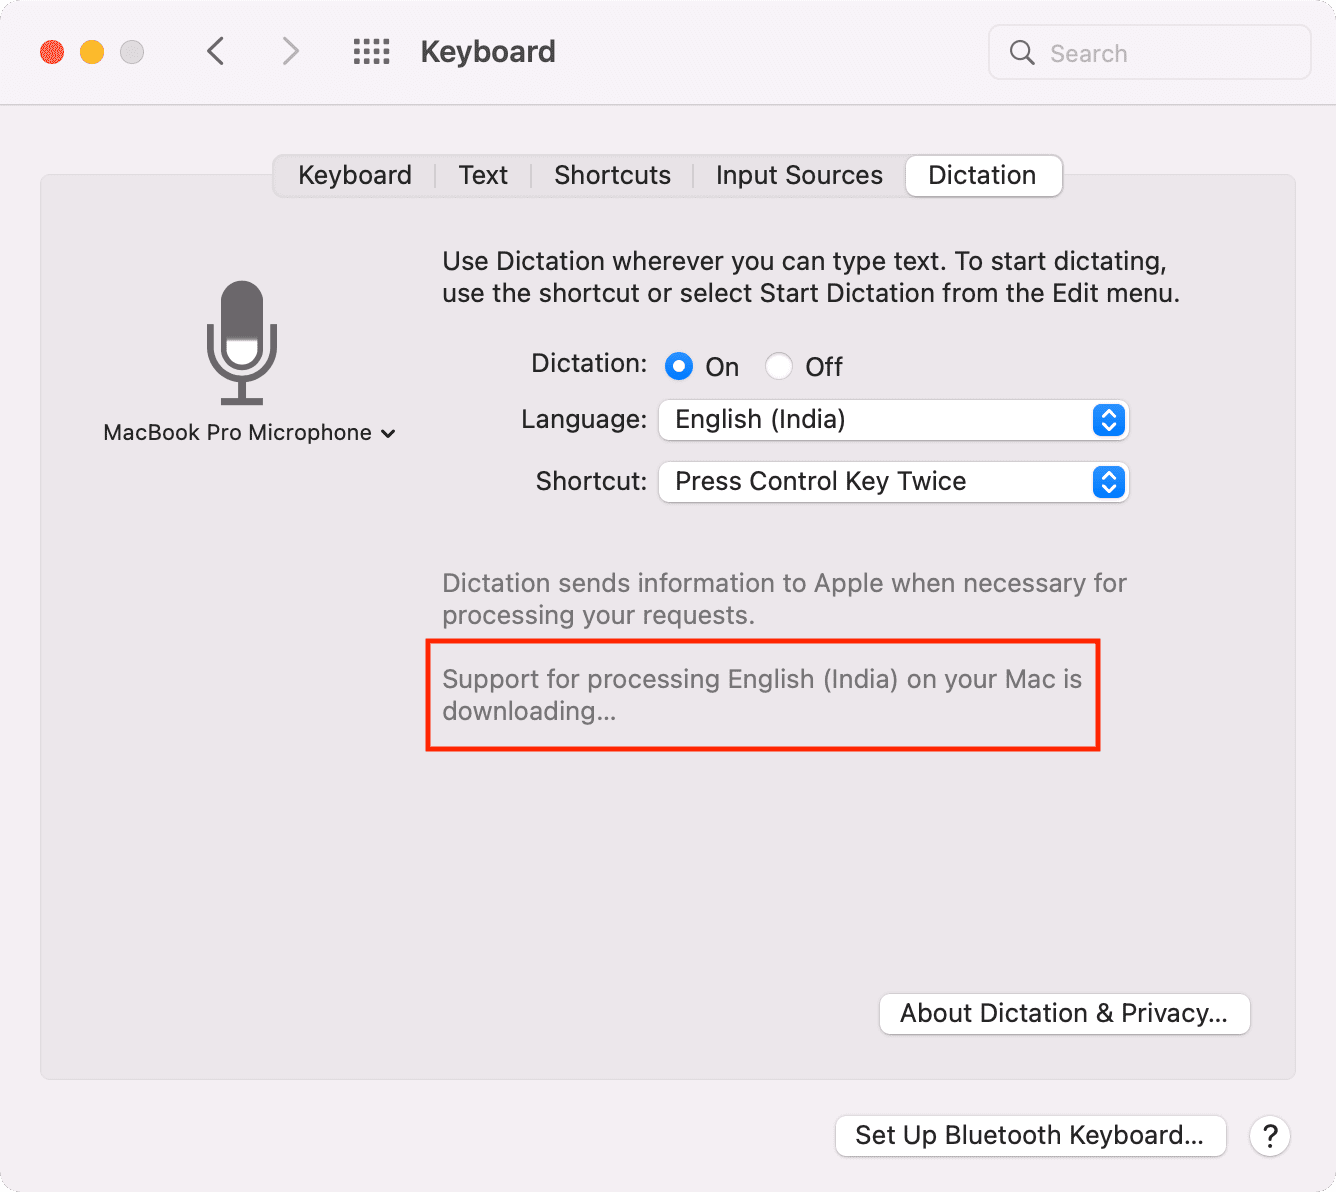
Notice: On a Mac with Apple silicon (M1, M1 Professional, M1 Max, M1 Extremely, and their successors), some fundamental dictation requests like composing messages or notes are processed on the machine while not having web. Utilizing dictation within the search field requires a lively web connection.
To make use of dictation offline on macOS Mojave or earlier, go to System Preferences > Dictation & Speech > Dictation and test the field for Enhanced Dictation.
Use dictation in a quieter room
If you happen to’re having patchy expertise with dictation on Mac, use it in a room with much less noise. That particularly assists you probably have an outdated Mac.
Tip: Dictation can take heed to you repeatedly for about 30 to 40 seconds. After that, you could pause and let it course and sort out what you mentioned earlier than talking once more.
Flip dictation off and again on
Go to System Preferences > Keyboard > Dictation. From right here, click on of. After being ready for just a few seconds, click on On to allow dictation once more.
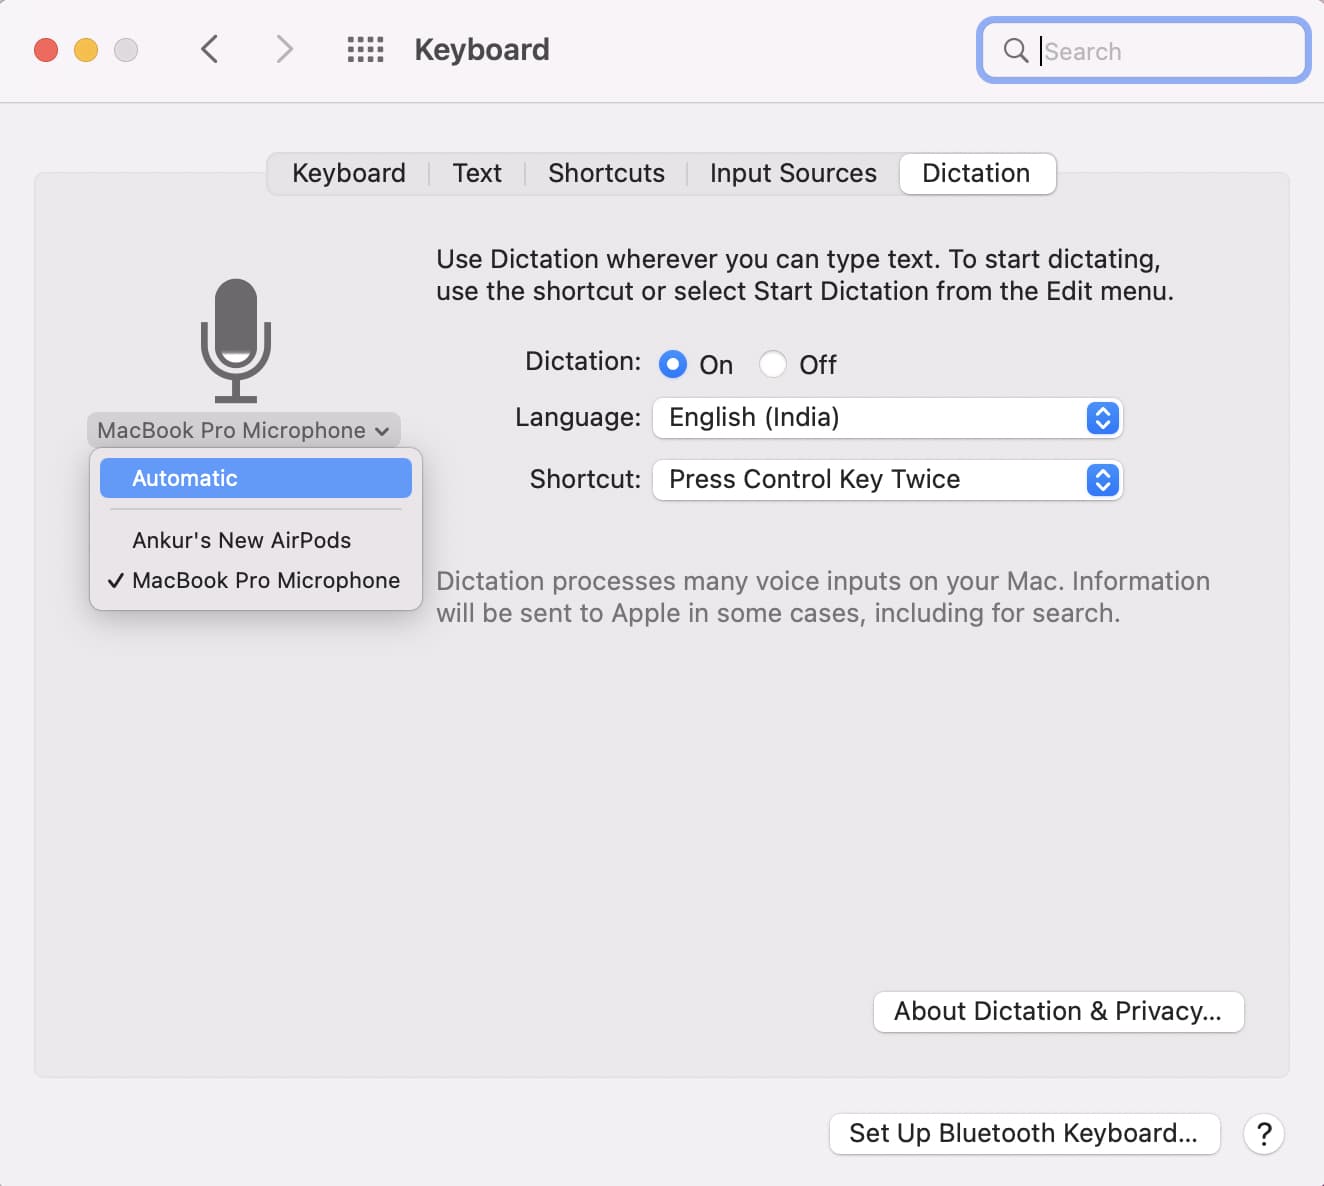
Choose the correct microphone for dictation
Whilst you’re on the dictation preferences display, be certain the right microphone is chosen. Choose Automated in the event you typically use AirPods or different audio gadgets together with your Mac.
Stop the Mac app and retry utilizing dictation
If dictation doesn’t work in a particular app, save your ongoing work and stop the app. You can do that by right-clicking on the open app within the Dock and selecting Stop.
If the app isn’t behaving appropriately, press Command + Choice + ESC. From right here, choose the non-responding app and click on Drive Stop.
Disable and allow Siri on Mac
In case the issue continues, take just a few seconds to show off Siri and switch it again on. For this, go to System Preferences > Siri and uncheck Allow Ask Siri. After just a few seconds, recheck the identical field.
Delete the Speech Recognition file
Lastly, if nothing helps, comply with these steps:
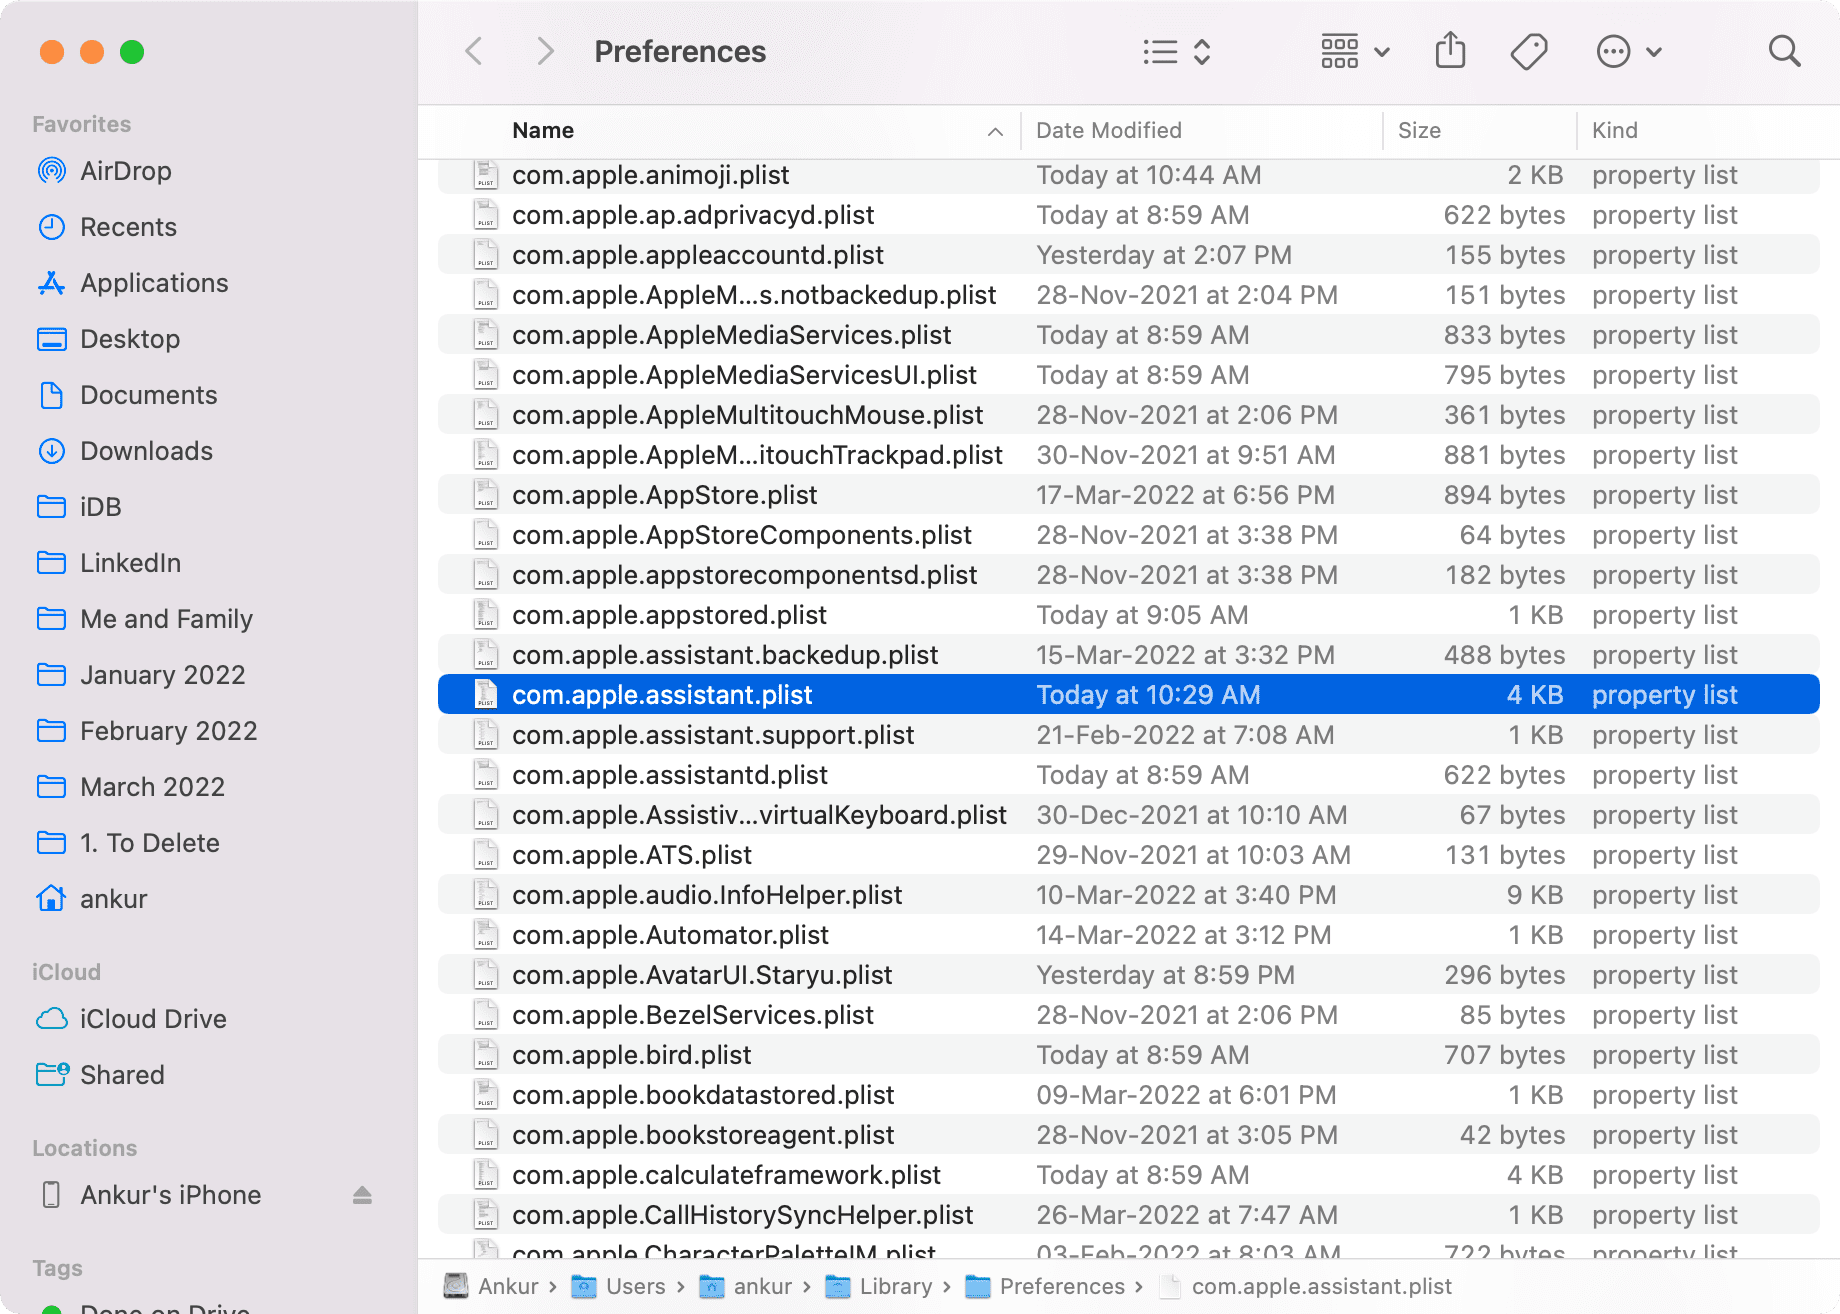
- From Finder, press Command + Shift + G.
- Copy this location path, paste it within the Go to Folder field, and press the enter key.
~/Library/Preferences/com.apple.assistant.plist - Delete this file from right here.
- Restart your Mac.
Now, attempt utilizing dictation and it ought to work completely. If the issue continues, go to ~/Library/Caches/com.apple.SpeechRecognitionCore and delete the file (in the event you see it).


Post a Comment
0 Comments